How To Use the InLinks Internal Linking Tool on Content
Written by ![]()

SEO is a process that involves a thousand details, some of them large, many of them small. Each individual detail doesn't do much on its own, but taken all together, they build into something much greater than the simple sum of their parts.
One of those relatively minor details is internal linking. While it might not seem all that important to link from one post to another (after all, users can use your navigation and search to find what they want, right?), it has an outsized impact on the way your SEO functions.
Of course, internal linking is also tedious, difficult to plan, and annoying to implement. You have to have a robust and near-encyclopedic awareness of everything you've covered on your blog, and the presence of mind to include links where relevant. On top of that, you have to go back and find mentions of topics to add internal links when you publish new posts.
Some of this you can do when you plan your content, such as building around content clusters with links built in, but that only helps so much.
On top of that, there's not really any such thing as too many internal links. The more you can work in organically, the better.
The good news is, you don't have to do all of this manually. There are a bunch of tools out there, ranging from keyword-based reminders to AI-powered content analysis tools, that can either give you ongoing link suggestions as you write or even add internal links automatically.
One useful tool is InLinks. I've found it pretty handy, so let's talk about what it is and how it works.
What is InLinks?
InLinks is a general SEO tool with a handful of features, centered around topic planning, technical SEO, internal links, content optimization, and social media.
As you might expect from the title of today's post, I'm going to be focusing on the internal linking tool, but it's worth mentioning the other things they do in brief.
The concept of InLinks is to view SEO from an entity-based perspective. Entity SEO is a new name for an older concept, the idea of viewing SEO and marketing in more human, conceptual terms rather than a purely mechanical keyword viewpoint. Search engines like Google have a great grasp on language these days, LLMs are using exceedingly complex math to determine relationships between words and phrases, and a whole collection of keywords can come together to represent a single entity.
There's a lot to it, so click that post up there and read my take on it if you like. For now, the main thing you need to know is that entity-based SEO considers a more holistic, interconnected view of SEO over a mechanical, keyword-centric viewpoint.
InLinks has developed its tools with this holistic viewpoint in mind.
- The topic planner focuses on keyword clusters and content planning around various entity-based concepts, rather than simple, boring keyword research. It helps focus on clustering, on pillar pages, and on planning around topics rather than specific individual words and phrases.
- The SEO system is a deep analytical knowledge graph that helps you identify the content across your site and automates schema markup to identify entity information for the search engines.
- The content optimization system is a bunch of writing tools that help you with outlining, content briefs, topic maps, related keywords analysis, and a whole lot of relational mapping to help you cover a topic in depth. It also includes an AI writer, because of course it does.
- The social media system is a generator for social media posts based on a language analysis of your site, so your posts are on-topic and compelling.
All of those are fine if you want to use them, but what I'm really here to talk about today is the internal linking tool.
What is the InLinks Internal Linking Tool?
InLinks is a tool that scans your site, identifies internal linking opportunities based on an entity-centric understanding of your topics, and helps you deploy those links rapidly. It doesn't require a CMS change to do it. So how does it work?
First, the InLinks system is let loose on your site and scans all of your site content. It uses semantic indexing, the same sort of language understanding underlying Google's understanding of language and the basis of LLMs, to identify the core entities your site covers.
Then, it looks for text throughout your site that matches two criteria:
- It mentions an entity your site covers
- It's not on the page already covering that entity
Since, after all, it doesn't do you any good to try to make an internal link to the page the user is already on.
This effectively identifies potential anchor text that can point to another page on your site, because it's related to that entity.
All of this is then presented to you on the InLinks dashboard. You basically get a big list of two columns: the phrase the system identified, and the page they believe it can be used as an anchor to link to.
It won't choose text that is already linked, text that's in a subheading, or text that's part of navigation or other inappropriate places for a link.
This builds a linking list, which is maintained by InLinks. As you publish new content, it's automatically analyzed by the system, and new link opportunities are generated and added to the list.
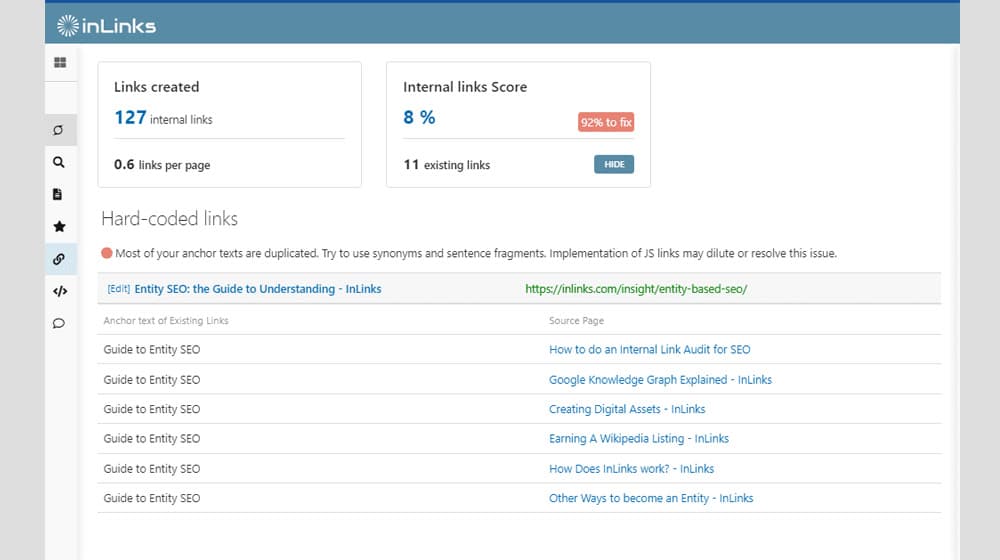
At this point, you have two options: you can add the links manually, or allow their automated system to handle it. Manually adding the links is, of course, a tedious and time-consuming process, but it results in hard-coded links.
For the automated option, all you have to do is add a single link of JavaScript code to your site. This code loads the list for the page and injects the right links at the right points throughout the content. When the page loads, links on the list are injected into the page. This updates in real-time whenever you make changes to the list, and automatically when you publish new content and have the InLinks system review it.
How to Use the InLinks Internal Linking Tool
If you're interested in using the InLinks internal linking tool, it's pretty easy to do. There are some pros and some cons I'll get to later, but for now, here's the step-by-step for using it.
Step 1: Sign Up for InLinks
One of my biggest gripes with InLinks is the pricing model, which is a credits system, but it isn't a clean or sensible credits system.

The cheapest plan is Freelancer and starts at $49 per month. It gives you 100 credits to start, which are renewed monthly and expire, so you can't bank them. Credits are consumed when you use their tools; one credit when you add a page to the system, five credits for an audit, five credits to generate a content brief, and so on. The one saving grace is that once a page is added to your projects, you can modify things like the schema and links they generate without consuming more credits.
Higher-tier plans have added features. Agency is $196 per month to start and gives you 430 credits, API access, and unlimited trends data and projects. Enterprise starts at 100k credits and is their full-service plan, so you can bet it's wildly expensive too.
The credits system doesn't cleanly play with these tiers, though. Instead, they have a "level" system for tiers. Freelancer encompasses levels 1, 2, and 3, which are 100, 205, and 315 credits each, respectively. Agency encompasses levels 4 through 40, with level 4 starting at 430 credits, and level 40 topping out at 7,900 credits.
This, to me, is all unnecessarily complex and nonsensical. In my view, any time you're presenting a 45-line spreadsheet for your pricing page, you're doing something wrong. Red flags like these in service agreements are worth paying attention to before you commit.
They also have a free trial, but it's not really free. You have to sign up and pay for the first month, then register for a demo and attend a demo session, and then the agent in charge will refund you for the first month.
The hoops, guys, the hoops. Your clients aren't circus animals!
Anyway, sign up for the cheapest tier you can to give the tool a try and go from there. If you like it, it can be worth dealing with the hassle to get it working for you. I wouldn't be writing about it in this much detail if I didn't think there was something worthwhile beyond the hassle, after all.
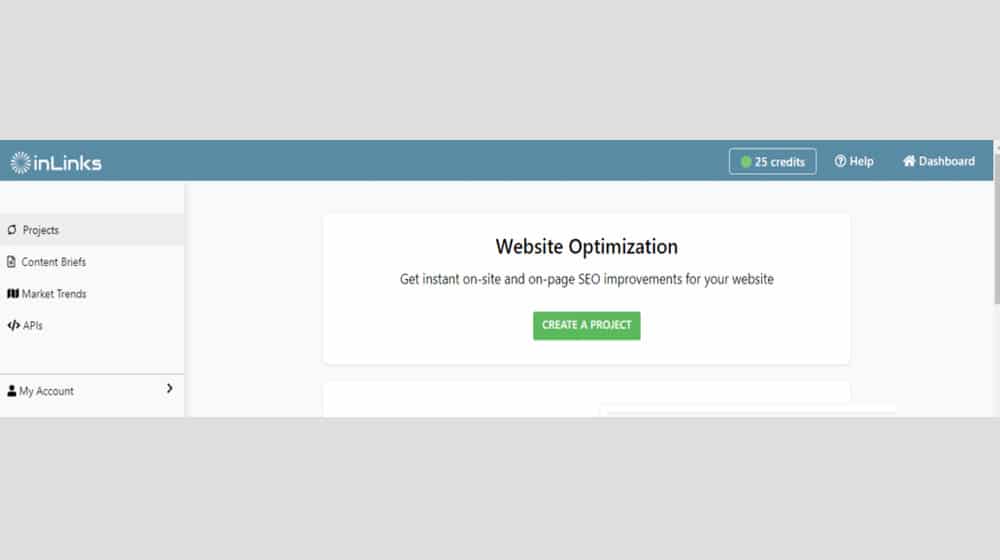
Step 2: Create a Project
Once you're registered, you'll have access to the dashboard and your initial credits.
First, you need to make a new project. They'll ask for your domain and your target market, which helps prime the system for the kinds of entities you'd be talking about. This is important; the "apple" entity is very different if you're a food blog versus a tech blog, right?
InLinks will do a Google site search for your site and tell you how many pages they find. This will, probably, be more than you have credits for, though it depends on the tier you bought and how big (and well-indexed) your site is. They'll show you a graph of how many credits you've used (should be zero at this point), how many would be required to do their automatic selection, and how many you'd have available.
Here you can choose either the aforementioned automatic selection, or manually choose an amount of pages to add. This is the starting pile of pages on your site that InLinks will analyze for you. They'll also tell you how many pages they think you should add to start.
I recommend adding pages manually here. You probably have a good idea of the top-performing pages on your site, and those are going to be the most important to focus on right away. Add your top list, probably around 20-30 of them, to start if you're on the 100 credits plan. If you're unsure which pages to prioritize, it may be worth reviewing posts with zero visitors to decide whether they're worth including at all.
Click the button and let it start analyzing, and it will build your initial project for you.
Step 3: Start Building Associations
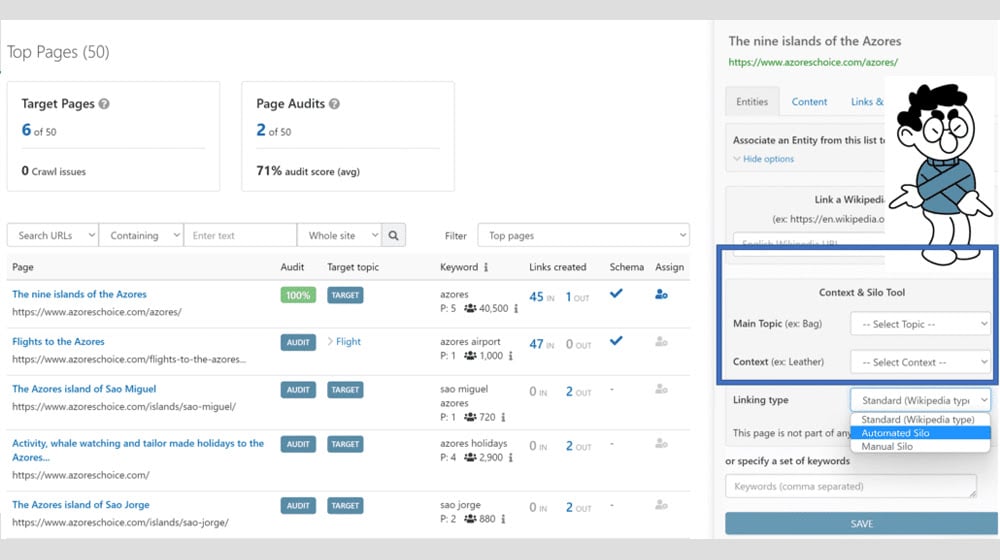
Your project will be populated with a lot of data, all relevant to various aspects of the InLinks tool suite. Since we're focused on linking, we'll want to go to the linking section, but we can't do anything with it yet. First, we need to build entity associations with the pages we imported.
Start at the page level. Each page that was imported has a page entry. Click on one, and click the target button. This will show you a list of possible entities InLinks has decided are relevant to the page. You'll want to scroll through this to find the one most relevant to the page, and click to associate it.
Always pick the most relevant entity for a page, because once an entity is associated with a page, you can't associate that entity with another page elsewhere. This helps prevent conflicts and encourages less duplication and cannibalization in your content.
If, somehow, InLinks was unable to identify a relevant entity, you can use the advanced options to import a Wikipedia page relevant to the topic. You shouldn't need to do this, though.
You will also want to go to the topic level and look through their knowledge graph, and identify target pages for the top topic entities. This is effectively identifying your pillars for various cluster topics. You might only have a couple of these, depending on how many pages you added and how related they are.
Step 4: Initiate and Evaluate Linking
Now that all of your content is associated with entities, you can start working on the internal linking tool.
In the advanced settings for a page, you can choose one of three linking types.
- Standard
- Automated Silo
- Manual Silo
Standard is the Wikipedia-style "anything relevant can link to anything else relevant" model. You'll naturally build clusters this way due to the conceptual relevance of different topics and entities, but the borders won't be firm. The silo options allow you to essentially specify a cluster for the internal links to operate within, but prevent linking outside of that cluster. Personally, I think the standard model is the best in general.
InLinks will automatically seek out linking opportunities to build, once your entities are associated with their pages.
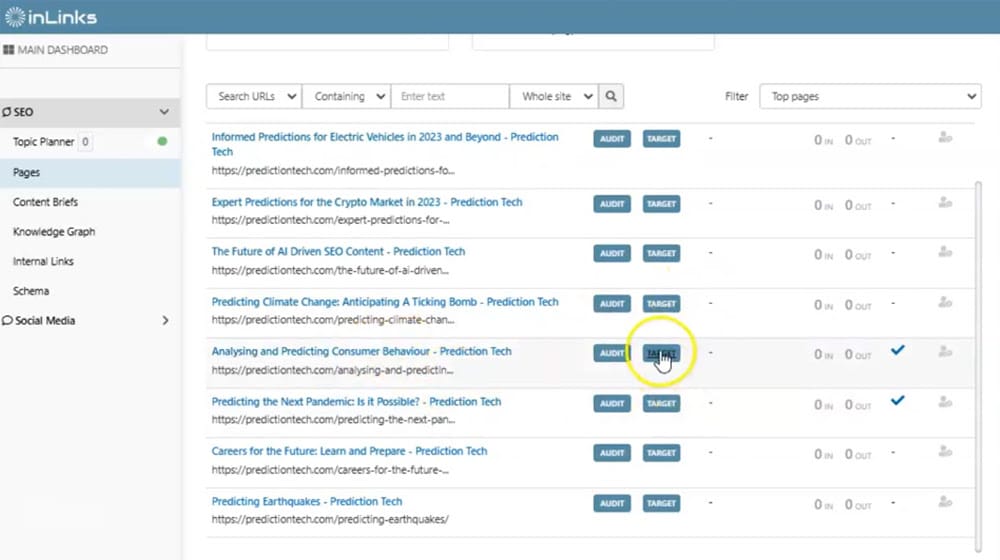
Your next step is to go to the internal linking tool dashboard and look at the links they're generating for you. You can filter the list based on the source page or the target page; I recommend the target page, so you can see the links pointing to any given page and see how well they match that topic's relevance, rather than grasping a bunch of different topics from a single source page.
Go through all of the links. If you think they're fine, leave them alone. If you think it's irrelevant or unnecessary, click the broken link icon to remove it.
You can, of course, just choose to trust their evaluation and let it ride. I like to review it, since they do occasionally make a mistake, but a weird internal link isn't going to kill your SEO, so it's not something to stress too much over.
Step 5: Implement the Links
Finally, you have to choose how to implement the links.
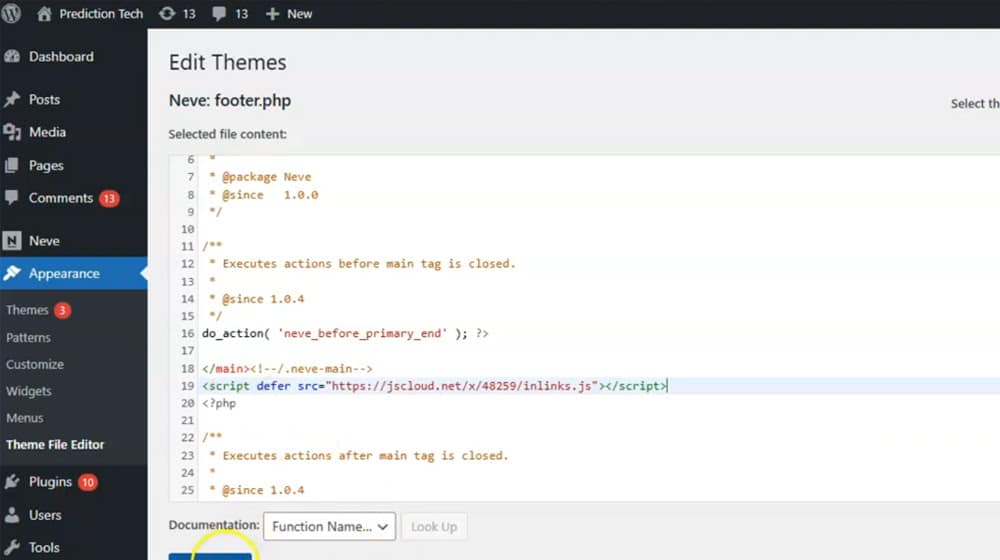
The default method is to add the InLinks JavaScript to your site. This is just a single line since it calls a remote file in the InLinks ecosystem. It will load deferred on page load, check if the page is in the InLinks system, and if so, check the links to inject and add them to the page.
The alternative is to use the link suggestions InLinks provides you and add the links manually to your pages.
Why would you jump through all of those hoops and do it manually?
Sometimes, Google doesn't fully render JavaScript, or has issues with scripts, or chooses to ignore things generated with scripts. This used to be a huge issue; Google wouldn't render scripts at all, so you would want to generate static versions of your pages for the search engines.
Google isn't completely anti-scripts these days, and they're generally pretty good at running scripts and rendering sites before indexing them. But, there's always the chance that Google might choose not to run that particular script.
A second reason is user script-blocking. Ad blocking is common these days, while full script blocking is rarer but still happens. Users blocking scripts are not going to see those links.
Third, it may or may not play nice with caching plugins you use. A good caching plugin will render the page live and then cache it for however long the cache lasts, but this does take away from the "real-time" nature of InLinks. It's up to you if that's important. I don't make daily changes to it, so I don't worry about that rapid turnaround.
Finally, you're beholden to InLinks. If you hard-code the links they recommend, then you don't lose anything if you cancel your subscription, if their business goes under, or the script changes. On the other hand, if you rely on their script, when you cancel your subscription and lose access to the script, all those links disappear too.
My recommendation is to use the script initially, but go through and add the links manually over time, so you retain them.
Is InLinks Worth Using?
I'm a little on the fence here.
On the one hand, what it does is very good. Building contextual internal links is hard, tedious, and time-consuming, and anything that automates it is beneficial.
On the other hand, it's a soft lock-in to a weird pricing model. You're paying a minimum of $50 per month for these links, and the longer your site grows, the more you end up having to pay to keep adding pages to the project.

I recommend exploring the other tools InLinks gives you. If you find several of them worthwhile, then sure, maintain the subscription and keep the links rolling automatically. If you aren't enthused and you don't think you'd stick with them long-term, work on adding the links automatically.
Internal links are good, and InLinks is good at identifying relevant opportunities for those links. I just think they've put a couple of roadblocks in the way that make it a little less valuable to rely on them long-term. You're free to make your own choice, as always.
Written by James Parsons
Hi, I'm James Parsons! I founded Content Powered, a content marketing agency where I partner with businesses to help them grow through strategic content. With nearly twenty years of SEO and content marketing experience, I've had the joy of helping companies connect with their audiences in meaningful ways. I started my journey by building and growing several successful eCommerce companies solely through content marketing, and I love to share what I've learned along the way. You'll find my thoughts and insights in publications like Search Engine Watch, Search Engine Journal, Forbes, Entrepreneur, and Inc, among others. I've been fortunate to work with wonderful clients ranging from growing businesses to Fortune 500 companies like eBay and Expedia, and helping them shape their content strategies. My focus is on creating optimized content that resonates and converts. I'd love to connect – the best way to contact me is by scheduling a call or by email.


Comments