Step by Step Guide to Submit a Site to Bing Webmaster Tools
Written by ![]()

There's an unfortunate tendency amongst marketers to zero in on Google and only concern ourselves with what Google says and does.
To an extent, it makes sense. After all, Google has been holding steady at around 85-87% of the global search market share. The vast majority of your value from search and search engine optimization will come from Google, so paying attention to what Google says is critical.
Bing search engine, Microsoft's Google competitor, accounts for around 7% of global search traffic. If you can get your website listed on Bing, you can take advantage of that traffic. Plus, relatively few marketers take the effort to do anything to optimize for Bing, so you'll be working with a distinct advantage.
Yahoo.com is also powered by Bing now, which isn't considered in the market share report linked above. That's a decent chunk of search volume between the two sites.
That said, what if you could get a 7% traffic increase from a simple action? Would you take that action?
That's not to say you're going to see a sudden surge of traffic, that Bing has no idea about your website already, or that you'll be completely uncontested. After all, Bing operates very similarly to Google, and even if it's not a dominant force, plenty of marketers do still at least do the bare minimum.
So, what can you do to submit your site and start taking advantage of Bing?
Key Takeaways
- Bing holds ~7% global search share, and Yahoo runs on Bing, making submission worthwhile for additional traffic.
- Register using an existing Microsoft, Google, or Facebook account, then add your site manually or import from Google Search Console.
- Submit your XML sitemap directly to Bing, as Google sitemap submissions don't carry over automatically.
- Verify site ownership via XML file upload, HTML meta tag, CNAME DNS record, or WordPress SEO plugins like Yoast or Rank Math.
- After setup, use Bing's keyword research, URL inspection, site scan, and backlink tools to monitor and improve performance.
Why Use Bing?
In addition to Bing.com being the #2 search engine globally, it's not entirely identical to Google. They have plenty of variance in how their algorithms work and what their users prefer. These differences mean that your actions to optimize for Google may or may not optimize for Bing. You can usually take a few additional steps to optimize for Bing as well.
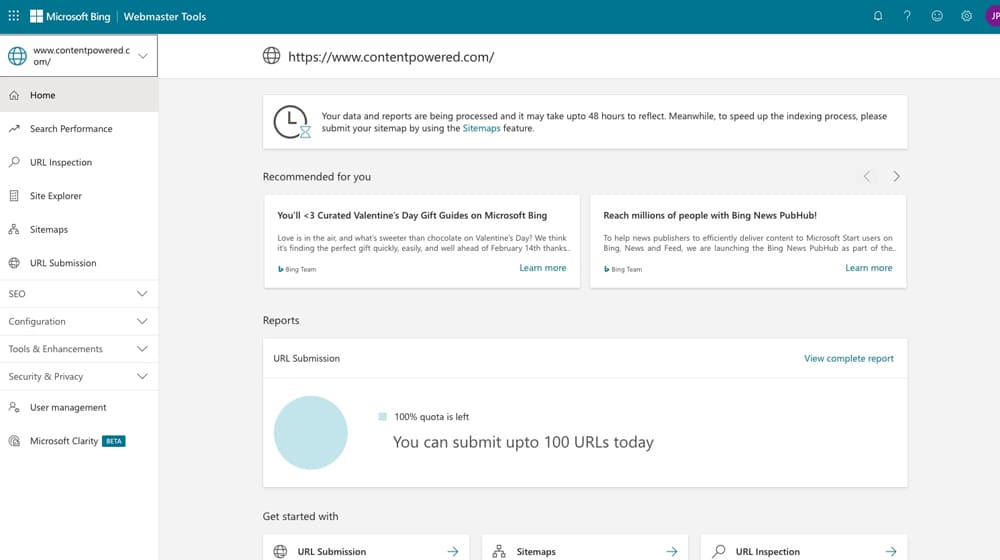
Using Bing Webmaster Tools, you get insights into your site and SEO reports from Bing's perspective. You can see your site performance on their search engine, you can see the keywords you rank for, you can submit new sites or new pages to be crawled, and you can handle spam and disavowal issues that you may have already addressed on Google.
The most significant benefit, frankly, is the keywords. Bing's algorithm is just different enough from Google's that you may have a slightly different set of keywords, but they'll still be broadly relevant. Sometimes, Bing's keyword research tool data can give you ideas on what to produce for Google for more search performance. You might also find our Keyword Clustering Tool helpful when organizing those ideas.
The other main reason to configure your site on Bing's Webmaster Tools is to ensure timely indexing. You've probably taken all of the standard steps with Google, like using the URL inspector or submitting a sitemap, but those don't help with Bing. You're just leaving Bing to crawl the web on its own and hoping they find you.

You may even see a slight performance increase on Bing for the SEO theorists out there. It wouldn't surprise me, and Bing says it themselves that it "improves your search presence." This notice may be language borrowed from Google, or perhaps there's a chance that it will give you a slight edge. If you're curious why your results differ across search engines, it's worth reading about why sites rank differently on Bing vs. Google.
Are you convinced? I thought so. Here's how to get started.
Step 1: Register
The first thing you need to do is sign up with Bing Webmaster Tools. Just click this link to go to the homepage for their tools. Click "Get Started," and a box will pop up asking you to choose a service to use an existing account to log in. Your options are Microsoft, Google, and Facebook.
Since most of you will have a dedicated Google account for your business, you can use that. If you have a Microsoft or Facebook account dedicated to your business, you can choose whichever one you like best. It doesn't matter; it's just a way for Microsoft to manage accounts without having its own Bing Account system. If you're wondering how rankings differ between Bing and Google, it's worth exploring before you get started.
Step 2: Add Your Site
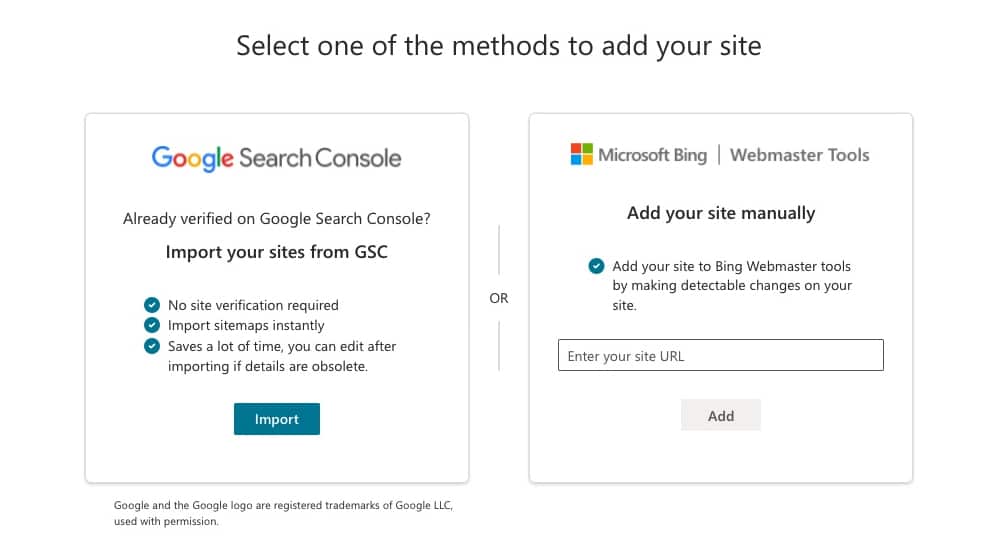
Once the account creation process finishes (it's all automatic), you'll be asked which option you want to use to add your site. If you authenticate via Google, you're allowed to import data directly from the Google Search Console. Otherwise, you'll need to add your website manually.
If you choose to import data from Google, Bing will need read-only permissions. They check immediately to import data, and then they check every so often afterward to update, verify, and ensure data is accurate. If you don't want Microsoft to access your Google information or want them linked, you probably shouldn't use the import process; do it manually instead.
Bing will take up to 48 hours to explore, scrape, and generally analyze your site to populate your dashboards. However, that doesn't mean you can sit back and wait for two days; we have some other tasks to perform as well. You may also want to use our Redirect Chain Checker to make sure your URLs are properly configured before Bing finishes crawling your site.
Step 3: Add a Sitemap
Submitting a sitemap to Google allows Google to scrape and analyze your site and monitor a single file that tells them when a webpage is updated. Submitting a sitemap to Bing does the same thing. Here's how to do it.
On your dashboard, in the left-hand column, is a Sitemaps entry. Click it. If you imported data and Bing could copy a sitemap, you might see your sitemap already. In my case, even though Google has my sitemap, Bing didn't scrape it, so I had to enter my site's XML sitemap manually.
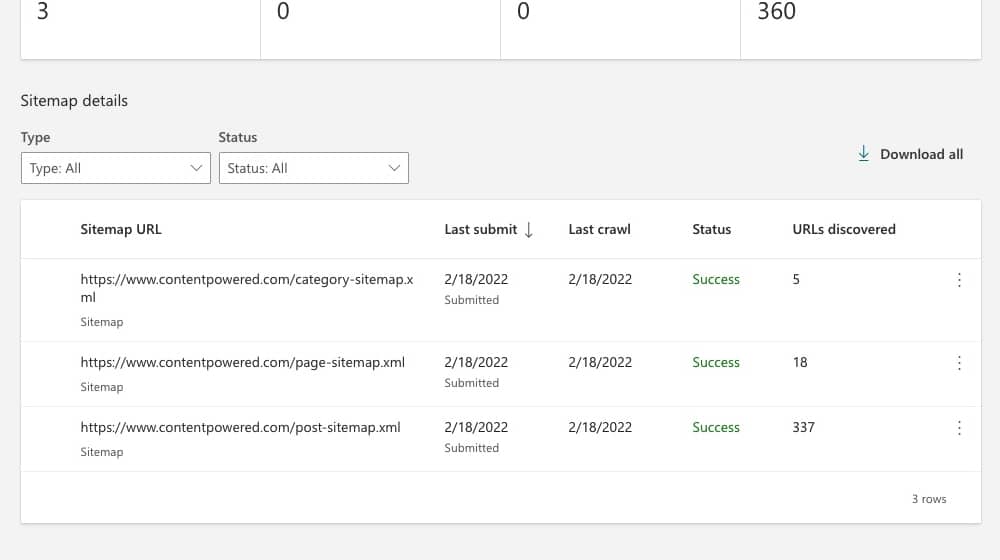
Luckily, it's easy to do. Bing has a button that says "submit a sitemap" that, when you click it, pops up a window asking for a URL. Type in your sitemap URL (something like https://example.com/sitemap/xml) and hit submit.
Click submit, and you're good to go. Once again, it will take Bing a bit of time to process the sitemap before you see results.
Step 4: Verify Your Site
You know how, when you add your site to Google Webmaster Tools or install Google Analytics, you need to add a bit of code to your site to verify site ownership? Well, you have to do the same thing with Bing.
If you used the Google Search Console import feature, you don't need to verify; they import verification from Google. Go ahead and skip this step. Otherwise, keep reading.
There are several different ways to verify your site if you didn't import:
- Upload an XML file via FTP
- Add a HTML meta tag to your homepage
<head>section - Add a C-Name record to your DNS
All of them start the same way:
- Click on your site name and the three stacked dots next to it.
- Click on the Verification button that appears.
Now, your options.
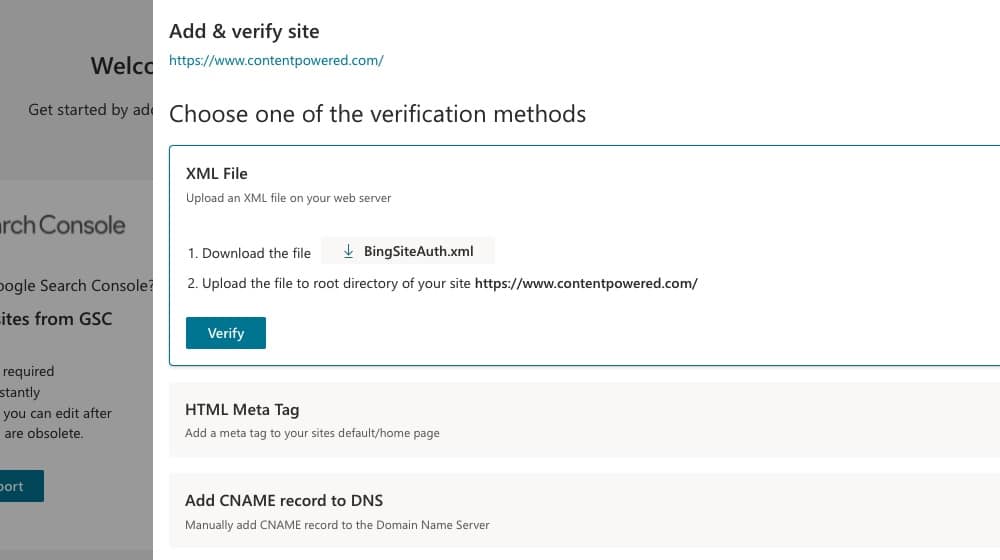
1. XML File
The XML file option requires downloading a file from Bing containing a verification code called BingSiteAuth.xml. It should be accessible at https://example.com/BingSiteAuth.xml. Once that file is in hand, upload it to your site's root directory via FTP.

Once uploaded, go back to Bing Webmaster Tools and click the Verify button. They'll look for the file and, once found, verify your site.
2. Meta Tag
If you don't want to upload a file, but you're able to edit your site's HTML, use this option. Bing will provide you with a code block that looks something like this:
<meta name="msvalidate.01" content="[a unique string here]" />
Copy this code and paste it into your homepage's <head> tags. It should be up there along with the meta title and meta description, though it doesn't matter where in the header it is or what order. You can use a meta tag extractor to confirm the tag is visible on your page after saving.
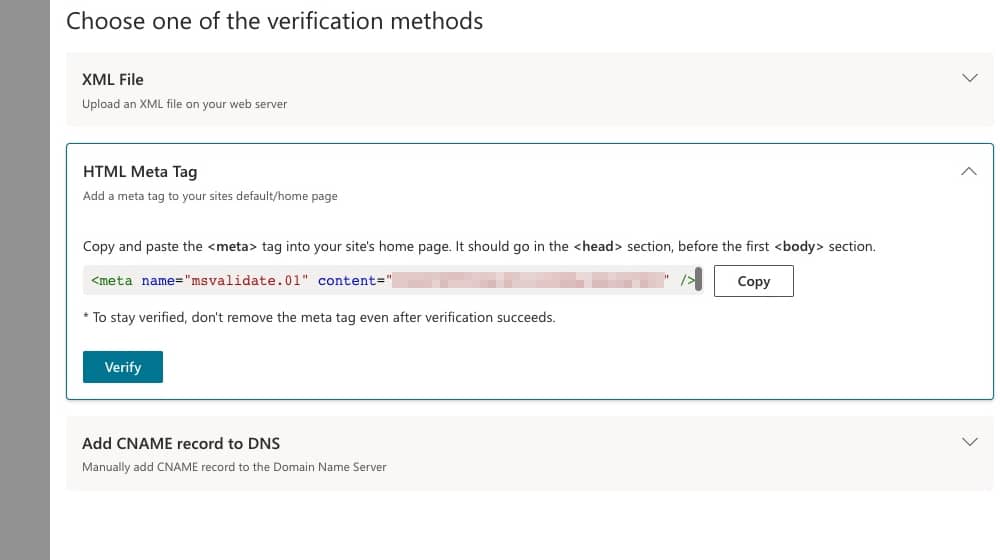
Once pasted and saved, go back to Bing and click to verify. They'll go out and check and verify your account.
3. CNAME Record
If you don't want to mess around with code or upload files but feel comfortable toying with DNS records, you can add a CNAME record. This one's more for the technical users out there, to be honest. Don't bother with this one if you have no idea what CNAME is or how DNS works.
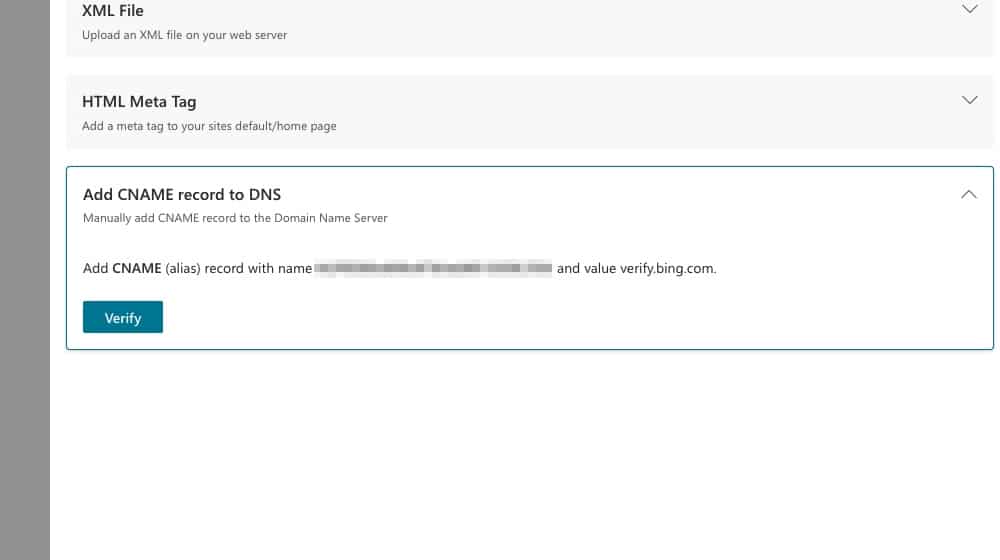
If you do, well, you already know what to do. Either way, Bing gives you the information and instructions you need to do it on their verification page.
4. WordPress Verification
If you're using WordPress, chances are you have an SEO plugin installed. Most SEO plugins have a field where you can add a code string from Bing to verify without manually interacting with your code.
- Yoast SEO provides it under their Webmaster Tools section, directly beneath the Google verification box.
- All In One SEO gives it under Webmaster Verification and other tools like Pinterest.
- Rank Math provides it under Webmaster Tools in SEO Settings and other verification options.
Type in your Bing authentication string, save it, and go back to Bing and verify using the Meta Tag option. Bing should verify your website with no issue. If your site serves multiple languages, consider using the hreflang tag validator to ensure your international tags are also set up correctly.
Other Things to Do
What else could/should you do now that you're setting up Bing? There are a few things you can consider.
1. Fill out your profile.
Your profile, for Bing, is a few data points they can use to categorize you and your site.
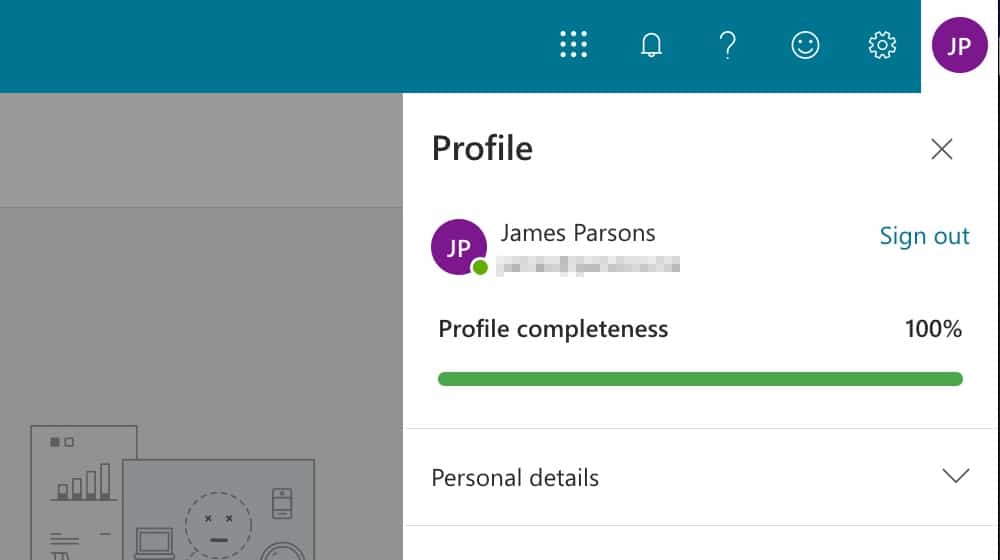
They ask you for:
- First and last names.
- Country.
- Phone number.
- Company Name.
- Job Role.
- Industry.
This data is all about you, not your business, and it's pretty generic. Frankly, I'm not sure what Bing uses it for, but it can't hurt to fill it out.
2. Test your robots.txt file.
Bing Webmaster Tools has a built-in robots.txt tester, which you can use to troubleshoot Bing-based issues. Most people have empty or near-empty robots.txt files, so there won't be much to test.

If you have one created by a security suite or that you've added and removed records to over some time, you might want to scan it to verify there are no issues with Bing's access. Bing even allows you to edit it in place.
3. Perform a site scan.
The site scan feature is available at the bottom of the Bing Webmaster Tools dashboard homepage. It will scan and audit your site looking for SEO and usability issues. Bing's idea of what makes a good site is slightly different from Google's, but if you're in Google's good graces, you're probably close enough to Bing's.
4. Spot-check URLs.
Two tools Bing offers - URL Submission and URL Inspection - allow you to submit a URL to Bing and see what they say about it.
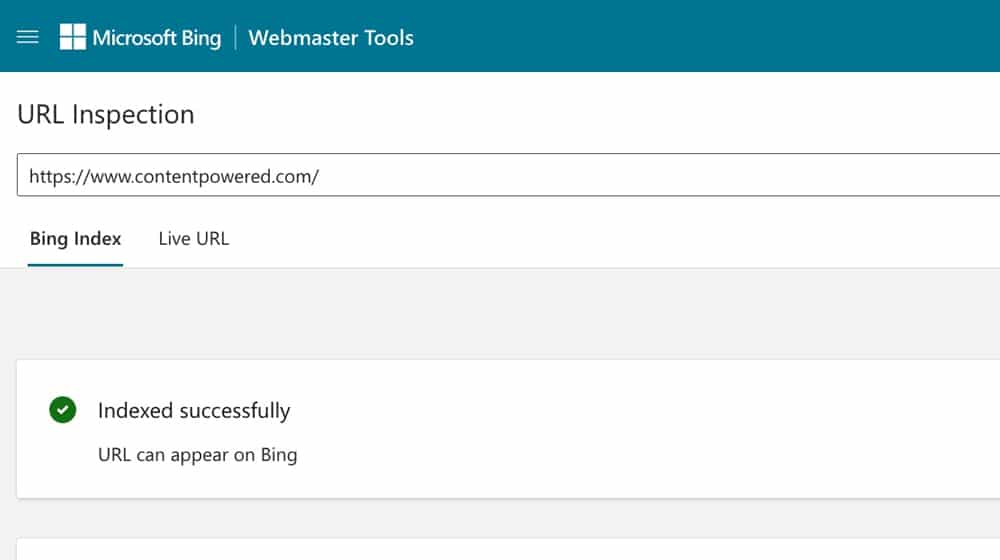
This step can verify that specific pages are visible (or aren't, if you don't want them to be, like attachment pages) and allow you to see issues. I recommend testing a few pages to make sure they work the way they should.
5. Consider Microsoft Clarity
Microsoft Clarity is Bing's version of Google Analytics, more or less. It's an advanced, optional analytics platform that can do things like record sessions for playback, monitor site activity via heatmaps, and provide you with deeper insights into how users are using your site.
You can read more about Clarity here and decide if you want to use it or not. It's helpful if you don't already have heatmaps and other analytics in place, but Clarity will probably be redundant if you're already using a heatmap and user session tracking app.
6. Consider Installing the Bing Webmaster Tools plugin
WordPress users have the option of installing the official Bing Webmaster Tools plugin to automate submissions and let Bing know when pages have been updated.
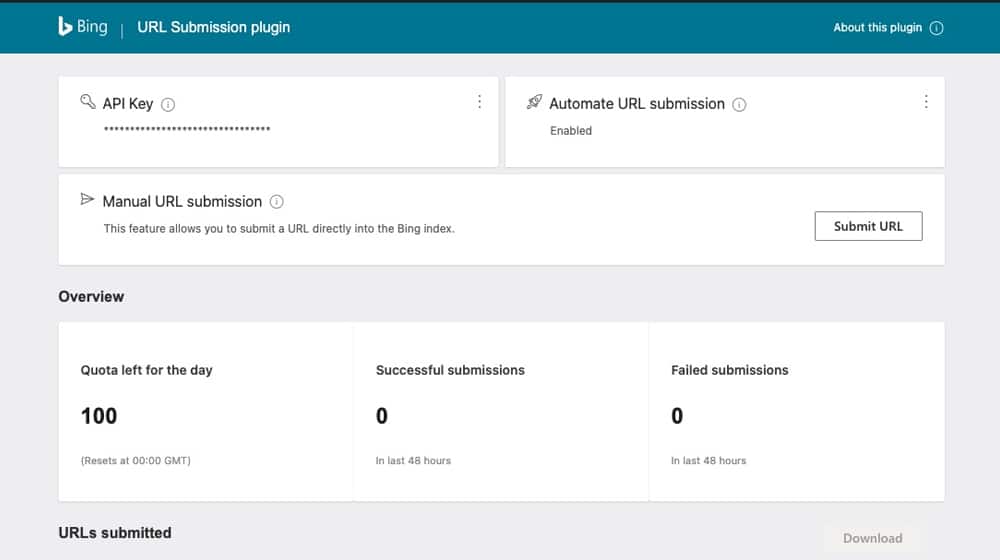
This process can speed up indexing and, as Microsoft puts it, "improves your search presence." To get started, you need to install the plugin and then generate an API key in your Bing Webmaster Tools account. After configuring and verifying your website, click the gear icon in the upper right to open the dropdown, then click "API access." Once you have your key, copy it into your WordPress plugin, and the rest is automatic. If you're also optimizing your structured data, our job posting schema generator can help you get more out of search for relevant listings.
Start Using Bing
At this point, you're all set, and you need to wait the requisite 48 hours for Bingbot to finish crawling and indexing your site. Once its crawler is finished, you can go back and start digging into their analytics.
Be sure to check out:
- Bing's backlinks. This section shows you the backlinks that Bing crawls, which might differ from what Google reports. You can review anchor text, referring URLs, and disavow links on the Bing index.
- Keyword Research. Bing provides keyword information and tracking, which can be very useful if you want to see your performance on Bing itself.
- Copyright Notices. Some of you might have the occasional copyright issue. Bing gives you notice of pages that need to be removed due to copyright issues, with the option to file a counter-claim if necessary.
- Submit URLs. Bing lets you paste in large lists so you can add groups of pages in bulk.
- Block URLs. This area lets you remove sensitive pages from Bing's search index. You can add individual pages or entire directories.
Ultimately, Bing Webmaster Tools will provide similar information as Google's version. Just use it the same way; monitor data, use it to inform future marketing and take advantage of greater awareness of how Bing works.
Has submitting your website to Bing been helpful to your SEO strategy? Do you have any tips that I left out or any questions for me? Please let me know in the comments section!
Written by James Parsons
Hi, I'm James Parsons! I founded Content Powered, a content marketing agency where I partner with businesses to help them grow through strategic content. With nearly twenty years of SEO and content marketing experience, I've had the joy of helping companies connect with their audiences in meaningful ways. I started my journey by building and growing several successful eCommerce companies solely through content marketing, and I love to share what I've learned along the way. You'll find my thoughts and insights in publications like Search Engine Watch, Search Engine Journal, Forbes, Entrepreneur, and Inc, among others. I've been fortunate to work with wonderful clients ranging from growing businesses to Fortune 500 companies like eBay and Expedia, and helping them shape their content strategies. My focus is on creating optimized content that resonates and converts. I'd love to connect – the best way to contact me is by scheduling a call or by email.


April 18, 2022
This sounds like a great idea and there's really nothing to lose by submitting our site to Bing. I'll try this out!
April 29, 2022
Hey Clara!
Pretty much. I hit new traffic records on Bing since verifying my site.
I know that coorelation doesn't imply causation, but the timing is interesting.