
How to Add a Table of Contents to Your Shopify Blog (Free Tool)

I'm a firm believer in the power of a table of contents. I've seen some pretty dramatic effects ever since I started using them on my site, and so have the clients I've convinced to let me install them on theirs. I wrote a guide on automatically adding them on a WordPress site, and they're one of my top tips in my list of Advanced Blogging Tips. They're even great for some simple internal links, in a way. A table of contents helps both search engines and visitors digest your content better.
The thing is, not everyone uses WordPress. I covered how to add one to a WordPress site, but what about users of other platforms?
Well, I thought I'd start rectifying my coverage gap today. First, let's talk about Shopify.
Shopify is a popular eCommerce platform for online stores, but (as I've written many times before) the blog leaves a lot to be desired. They've been slowly improving it over the years, but it's still a long way from being a powerhouse like WordPress. That said, you can improve it on your own, and one of the ways is to add something like a table of contents. Anything that adds usability and functionality to a Shopify blog is excellent in my book.
To that end, I've found three methods you can use to add a table of contents to a Shopify blog.
Let's dig in!
 30 Second Summary
 30 Second Summary
Tables of contents are beneficial for user experience and SEO. To add one to a Shopify blog, there are three methods available: using the Jump Links Shopify app; changing your website's theme to one that includes a table of contents feature; or using a free tool that generates a table of contents from your blog's HTML code. Each method has its strengths and limitations. There is no best choice - the optimal method will depend on your specific needs.
Method 1: Jump Links Shopify App
If you're used to WordPress, you're probably used to having a dozen different choices to do pretty much anything you could want to your site. Unfortunately, the Shopify app marketplace is much sparser. They (as of this writing) only have one app to add a table of contents. That app is called Jump Links ToC, and here's how to use it.
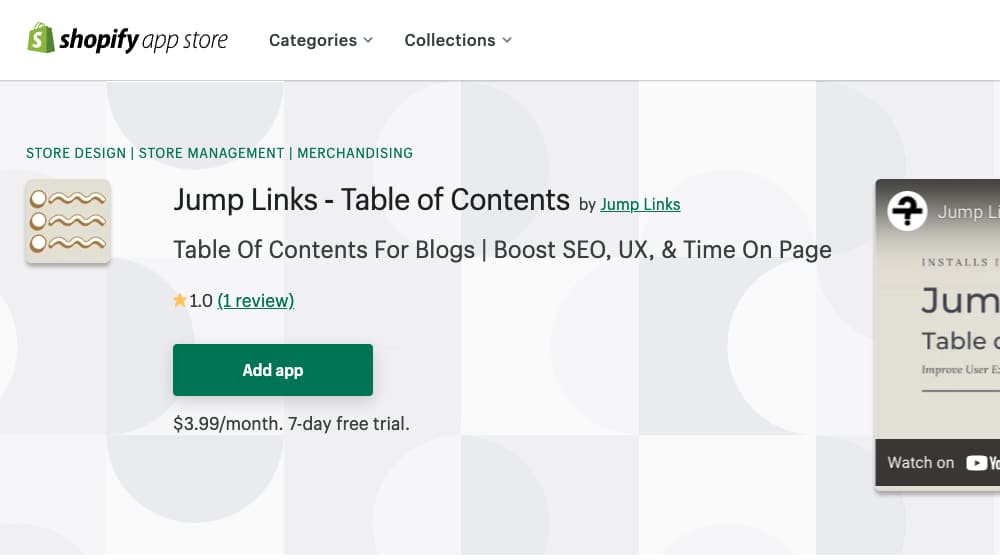
First, log into your Shopify account, then click the link above. That will take you to the Shopify App Store page for Jump Links ToC, where you can then click the "Add App" button to install it on your site.
From there, go to your Shopify store dashboard and click on the Apps section, and then the Jump Links ToC icon, which lets you open their settings.
In that settings menu pop-up, you can customize how the table of contents will appear on your posts.
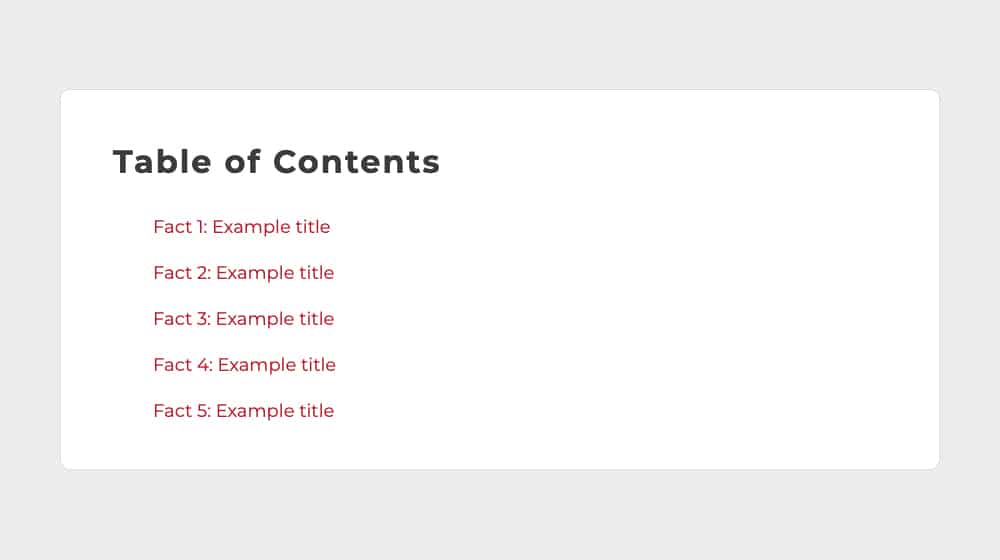
- Choose a header. You can have a title for the ToC box that says something like "Table of Contents" or "Navigation" or "Quick Links" or whatever you like, or not have anything at all. I prefer a simple header. Click the check box to enable it and type in your text, as desired. Bear in mind that it's an all-or-nothing setting; you can't customize it per-post.
- Choose an item/list format. You can have items be bullets or numbers. I prefer either bullet points or nothing; if they have numbers, my subheadings already have the numbers, so adding numbers here would duplicate them.
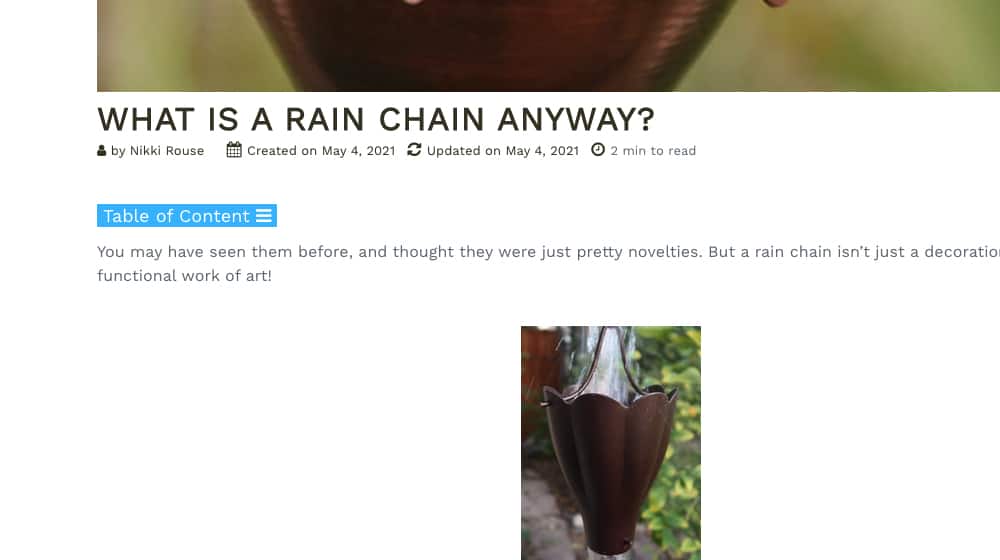
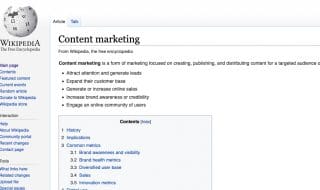
- Choose a position. You have two options here: the top of the page directly below the post title (and image) or right above the first heading in the post. Do you want to have an intro section above the ToC or not? This section is where you make that decision. Adding it before the first heading (right after the intro) is the best method, in my opinion, similar to how Wikipedia uses its table of contents.
- Set scrolling. "Smooth Scroll" will have the user scroll to the position in the post, whereas leaving it disabled will make it an instant jump. This section is just a user experience feature and won't affect SEO, so it doesn't matter all that much.
- Customize Design Theme. This section is where you apply colors and formatting to your table of contents. Background and border colors for the ToC box, title/link/hover colors, and so forth. Pick colors that match your storefront and homepage styling as closely as possible.
- Choose which H tags are included. If you're the kind of person who uses nested sub-sub-sub-subheadings down to H5 or H6, you can choose whether or not to have them. I usually recommend sticking to just H2/H3 and maybe H4 unless you're creating an immense reference document.
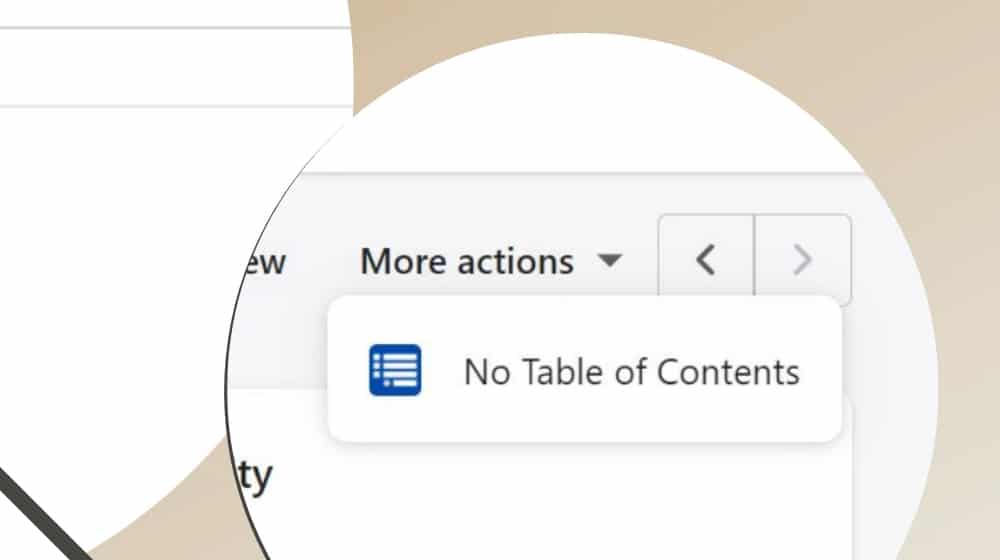
You can also choose specific posts (by post ID) to ignore when generating tables of contents for your content. It's a pain if you want a table of contents on some but not all of your posts, but if you want it on every post, you can ignore that section. It also adds a drop-down menu to your blog post section that enables you to click "No table of contents" if you want to disable it on future blog posts.
Finally, save your settings and then click the "run engine" button. It will take 30+ minutes to run, pulling all of your content, generating the tables according to your settings, adding those ToCs to the posts, and saving the changes. It's a big script doing it, and you have to wait for it to apply everything. If you make any changes to your posts between clicking Run Engine and finishing, those changes might be lost.
There are three major drawbacks to this app option.
- It costs money. Specifically, it costs you $4 per month, indefinitely, to use the app. The cost is a pretty annoying fee, especially for us WordPress fans who are used to getting simple plugins like this for free.
- It's not very customizable. The customization options are pretty much limited to what I listed above. It may or may not look good with your theme.
- It's clunky. That's not a problem with the app as it is with the Shopify API, though, so I can't blame them for it.
All that said, there are two other options I have for you. Ready?
Method 2: Changing Themes
The second method to add a table of contents to a Shopify site is to, well, change your website. Fairly dramatically, I might add.
See, rather than using an app for a table of contents, many Shopify themes have a table of contents baked into it out of the box. The problem is that you need to find a template with a table of contents, which is not exactly a popular feature. I only know of one theme variant that has it off the top of my head, and that's Plak Theme.
Specifically, it's both Plak and Grass, two of the themes offered by Plak the company. The other one, Sly, doesn't seem to have a table of contents.
There are quite a few drawbacks to this option, unfortunately.
- First of all, it's a massive change. Changing your theme is a huge investment and can disrupt your site's aesthetic and branding, and that's not an easy ask for something as relatively minor as a table of contents. Don't get me wrong, I love ToCs, and they're pretty valuable, but they're not that valuable.
- Secondly, it's pretty expensive. Plak costs $295 for a single-site license, with higher prices for more licenses. The Grass theme is very slightly cheaper, starting at $245. They're lifetime licenses, at least, but it's still a tall order, considering you have to completely change your website.
- Third, I don't think it looks as good as many competing themes. The demo page for the theme has a blog post with a sample, and it seems like a basic table with some default font/links/CSS. I'm sure you can customize it, but the whole theme looks pretty basic to me. It would take a decent amount of work to get it unique enough to build a brand on, in my opinion.
Still, I wouldn't recommend it as a realistic option, especially when other options don't require that you spend hundreds of dollars and completely redesign your website. Such as:
We create blog content that converts - not just for ourselves, but for our clients, too.
We pick blog topics like hedge funds pick stocks. Then, we create articles that are 10x better to earn the top spot.
Content marketing has two ingredients - content and marketing. We've earned our black belts in both.
Method 3: Use a Tool
Someone else was fed up with having to pay $4 a month for a table of contents, so they made a tool to generate one for you. It's not an app, so you don't have to pay to use it. However, you have to hope they maintain it and that it doesn't break at any point. Still, it's not that difficult to use.
Here's a quick tutorial:
1. First, write your blog post as you usually would. You want it to be in the Shopify window, though if you write elsewhere and only put it in Shopify as part of the publication process, you can do that too. The key is that you want the raw HTML, not the text.
2. Next, go to the HTML view by clicking the <> icon. If you didn't know, this section shows you the code behind the formatting and links and all that jazz. You'll want to copy the entire HTML for your post. The tool needs the HTML to know your headers (H1, H2, etc.), pull the text from them, and generate the table of contents with the jump links.
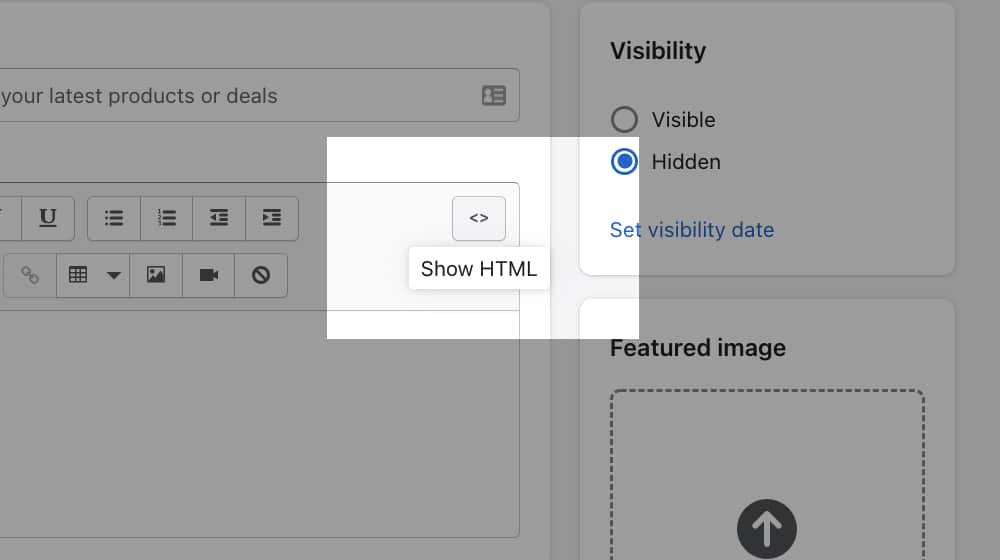
3. Then, go to the site for the tool, which is here, at the very bottom of the page.
Paste Your Blog Post HTML: ? When your blog post is finished and you're ready to add a table of contents, click the code button in the Shopify post editor (it looks like this <>) to switch to HTML mode. Then, select the entire contents and copy it to your clipboard (CTRL+C). Paste it into this tool to configure your table of contents.
Container Style: ? This is HTML code to style your table of contents widget. You can change these later if you're not familiar with code; this is the default theme.
List Style: ? If you want your lists to have bullet points, you can use list-style:disc; or if you want them to be numbered, you can use list-style:decimal;
Paste your blog post in the larger box at the top. Here, you can customize the container for the table of contents. By default, it has a 1-pixel border with some padding and margins and a pre-chosen color. You can customize this however you like as long as you know the CSS to do it. If you customize it, I recommend that you copy the CSS code into a document you can keep stored for whenever you use this tool. Alternatively, if you know what you're doing, you can code up a cloned version of the tool for your personal use. You can also customize the list style.
4. Once you have all that in, hit submit, and the tool will generate a new copy of your post. It's all the same HTML as your original post, with the HTML/CSS for the table of contents added to it. It would help if you had the whole thing because your headings and subheadings now have the anchors for the links in them. So, copy the entire code, and replace the code in the <> HTML view in Shopify with the generated code.
Now, there are a few issues with this option that I see.
- You have to repeat the process every time for every post. This process includes customizing the CSS in the box because the tool won't save it for you. Also, if you edit your blog post enough to change your subheadings, you'll need to re-generate the table of contents or manually edit your HTML code to update that new subheading in your table of contents. This plugin generates a static element, so if you change the title of one of the jump links, you also need to update the table of contents title to match.
- It doesn't account for scroll offsets the way the first option on this list can. If you have a navigation bar that scrolls with your site, it will cause an offset on where the scroll leads. You have to add that offset to fix the issue manually.
- It plops your table of contents at the top of your article. You'll probably want to move the generated code above the first heading in your article.
That's mostly it. It's not a bad tool, and adding a table of contents of any kind can be beneficial for your user experience, search engines, and ultimately for your conversions.
It does add extra steps and can be tedious to do if you have a detailed blogging process. I hope that somebody creates an alternative that automates this applies a table of contents to previous posts.
Hopefully, we'll have a better option in the future, but this is one of the best options available, and it's completely free.
Are There Other Options?
Usually, I cap off a post like this with "these are just three of the many options available" or some other way of mentioning that my recommendations aren't comprehensive, and I can't do that this time. As near as I can tell, these are the only three ways (short of custom code you develop yourself) to add a table of contents to a Shopify blog.
That's it.
Until a better option comes along, this is what I've got for you. Now, is it worth using these options for a table of contents? Maybe. I'd probably go with the app, to be honest. A table of contents is excellent, but it's not worth changing your theme over. The manual process would get tedious after a while, especially if you need to apply it manually to hundreds of existing blog posts. That said, the decision is up to you.
James Parsons is the founder and CEO of Content Powered, a premier content marketing agency that leverages nearly two decades of his experience in content marketing to drive business growth. Renowned for founding and scaling multi-million dollar eCommerce businesses through strategic content marketing, James has become a trusted voice in the industry, sharing his insights in Search Engine Watch, Search Engine Journal, Forbes, Entrepreneur, Inc, and other leading publications. His background encompasses key roles across various agencies, contributing to the content strategies of major brands like eBay and Expedia. James's expertise spans SEO, conversion rate optimization, and effective content strategies, making him a pivotal figure in the industry.

November 16, 2021 at 5:00 am
Great content and thank you for linking this tool to add a table of contents to my Shopify blog
November 16, 2021 at 7:06 pm
Thanks Deepinder! I'm glad you like it. We use this on our client's websites as well, it works great!
December 22, 2021 at 4:43 am
It's a great blog, A table of contents helps both search engines and visitors digest
your content is better. Shopify is a popular eCommerce platform for online stores.
Shopify may auto populate your meta description with the table of contents. You don’t want that.
December 31, 2021 at 4:28 pm
Thanks Harshal!
I haven't heard of Shopify populating meta descriptions automatically, which app does that?
It's funny, I use the table of contents generator constantly now for Shopify. It's useful, quick, and free. Hard to beat it.
Happy new year!
June 02, 2022 at 9:51 am
Thank you for this tool, amazing! Quick question, after I save the blog post, the table of contents link list keeps indenting farther right then what it should be. Any idea what's causing that?
June 03, 2022 at 5:02 pm
Thanks, Mark!
Regarding that indentation, do you have any H1's in your post?
If so, the script could add an extra "ul" tag, which would increase the margins a bit and push it to the left.
Most blog posts shouldn't have an H1 in the blog post body (that's reserved for the article title outside of your content), but it's worth checking.
June 03, 2022 at 5:45 am
Hey Content Powered team!
First of all- I want to thank you guys for the awesome content and super helpful tool!
I am using your tool very extensively now, and it works great!
Though I would like to share my experience and some open questions and suggestions to you guys and to the community.
1. Suggestion for users- always- ALWAYS save the original HTML code somewhere, if for some reason you want to make some changes to the blog post in the future (like add another heading with some text, or a photo) you should do the edits to the original code and then again post the HTML code in the tool, otherwise it slightly messes up the structure of the table of contents and if you've added a new heading with the H1,2,3 etc. tag, then the new tag will not be populated with an anchor and therefore will not show up in the table of contents, and if you try and add the code which already was previously generated by this tool, then it messes up the structure of the table of contents, and some headings in the table will be very visibly offset.
2. Suggestion for the developers- it would be very awesome, if there was an option to choose to not include the lines, because in the table of contents I usually don't want to mention every single heading (otherwise the table of contents becomes too long) so I would go and delete the non essential headings from the TOC, but when I do that, the rest of the headings are being offset more. In some situations it is much more preferable not have this offset, and just have all of the headings in the TOC appear in line with each other.
Other than that- this tool is amazing and much praise to the devs for making this tool free and available to the public!
You're the best!
Thank you!
June 03, 2022 at 5:00 pm
Hey Janis!
Thanks for your feedback!
I agree that backing up the original HTML is a good idea. It has to insert those jump anchors throughout the post, so those can be a pain to manually remove if you decide to scrap the Table of Contents, especially for giant 20,000-word blog posts with many subheadings.
Regarding the option to not include specific headings, that's a fascinating idea! Thanks for sharing; we'll add this to our to-do list 🙂
July 12, 2022 at 3:29 pm
Wow, that generator is super helpful! It worked for me.
July 12, 2022 at 3:44 pm
Thanks Shari, I'm glad!
October 11, 2022 at 10:18 pm
Thank you for sharing this tool!
October 22, 2022 at 6:23 pm
Hey Patrick, you're welcome!
November 24, 2022 at 4:01 pm
Love this tool. Thanks so much!
Is there a way to make the Table of Contents collapsible? I've seen it on a few other websites. My TOC get pretty long, so it would nice to have the TOC closed by default with the option for the user to toggle it open or closed.
November 28, 2022 at 3:45 pm
Thanks Spenser, I appreciate it!
Baking that functionality into the table of contents generator for everybody will take us a little bit, but if it has enough interest we'll definitely add that as an optional feature.
For a quick solution though, there is definitely a way to tweak the code to accomplish that.
I would start by searching on Google for "pure CSS collapsible div". You'd probably want to hide the "ul" tag by default, then add a link next to the "Table of Contents" heading that changes to "Show/Hide" when clicked. The CSS code would toggle the hiding or displaying of the unordered list when that link is clicked.
February 09, 2023 at 9:07 am
Thank you!
February 11, 2023 at 2:52 pm
You're very welcome!
December 08, 2022 at 8:47 pm
It's a great blog. Thanks so much!
December 08, 2022 at 11:47 pm
Thanks, Kyo! I appreciate it 🙂
December 28, 2022 at 1:23 pm
Hey James, great TOC tool.
Been using it lately for some blogs, however I noticed for one site it was causing alignment issues for the H2 titles on the TOC especially on the mobile site of the blog. Here is the link: (Link removed)
Appreciate your take on this.
December 29, 2022 at 4:11 pm
Thanks, Un!
I took a look and it looks great to me.
If you want to reduce the padding on your list items, you can add this to your ul style: padding-left: 10px;
So it would read: ul style="list-style-type: decimal;padding-left: 10px;"
January 02, 2023 at 4:08 am
Thank you for the amazing tool! i would like to ask how do you deal with the offset caused by the sticky header.
January 05, 2023 at 4:08 pm
Thanks, Doron!
The best way to account for a sticky header is to add some CSS code to your theme to offset your anchors.
You will want to re-position your anchor links so they aren't part of the heading itself.
You can place them as their own element directly above your H2's, e.g. < a id="table-of-contents-0"
This stackoverflow thread will help you: https://stackoverflow.com/questions/10732690/offsetting-an-html-anchor-to-adjust-for-fixed-header
It will take a couple of extra minutes to reposition your anchor links for every Table of Contents that you generate. But you'll have this same problem with most of the paid Shopify ToC plugins anyway.
Feel free to drop me a line if you get stuck and I'll do my best to help.
January 26, 2023 at 2:21 am
I never comment, but here I have to. Thank you so much. Love you bro!
February 03, 2023 at 5:04 pm
Hey that means a lot! Thank you Ruben!
February 10, 2023 at 4:24 pm
We also loved the free tool!
February 11, 2023 at 2:47 pm
Thanks Jon!
April 20, 2023 at 7:35 am
I found this blog, since I searched for a client to integrate a toc into the website. Some time ago I created the toc plugin for typo3 - the benefits of this small adjustment on the site are great.
I was looking for a backend liquid template, which I found on Github or Google under the name "Jekyll ToC". With a little adjustment, this has been used within the Shopify blog. Might be helpful for other developers who are looking for a way to integrate a toc into their Shopify theme
April 20, 2023 at 9:55 pm
Hey Ulf, thanks for sharing! Hopefully somebody finds this useful.
June 02, 2023 at 7:58 am
Thank you very much for this article, it was very useful. It's just what I was looking for. Greetings from Spain!
June 11, 2023 at 7:26 pm
Hey Alejandro, you're welcome! 🙂
June 04, 2023 at 11:37 pm
Wow, James!
This tool is awesome and literally changes my perception of the entire Shopify blog experience.
The Shopify blog interface is lacking in so many respects, but I almost could not believe that they do not have a Table of Contents option unless you pay for it?!?!
Thanks so much for this; it is truly a lifesaver!
June 11, 2023 at 7:26 pm
Hey Sabina, you're very welcome!
If you liked this, make sure you check out our YouTube lazy-loading tool:
https://www.contentpowered.com/tools/lazy-load-youtube-video/
Shopify doesn't have any way to lazy-load videos in blog posts, so speed and performance takes a big hit. This free tool helps optimize videos easily.
It's little things like this, basic functionality, that make Shopify so disappointing sometimes. Great eCommerce software, poor SEO. But it can be overcome with some effort, and we do it every day for our clients!
June 24, 2023 at 1:11 am
Thanks, will definitely try it!
July 12, 2023 at 3:39 am
Thank you for adding the table of contents generator, it works fine for me and has helped me to overcome a hurdle!
July 14, 2023 at 12:52 pm
Thanks Christopher, happy to hear it! Remember to bookmark it for later 🙂
August 21, 2023 at 3:03 am
Love the table of contents online generation tool, avoiding complex code and bloated app, just copy the code into the html of the blog, it’s great
August 23, 2023 at 1:10 pm
Thanks Noah! One less app to pay for, right?
January 17, 2024 at 12:02 pm
Hi James, thanks for sharing the tool! The toc works great on the desktop version, but for some reason it's not clickable on the mobile view. Is there a fix for that?
January 19, 2024 at 8:36 pm
Hey Aurva!
Something with your theme is likely conflicting with the Table of Contents. It's hard to tell what's causing that without looking at it.
Could you please drop me an email? Happy to take a look for you!
February 10, 2024 at 12:16 am
Pretty nifty tool! I know pretty much nothing about HTML so I was kinda scared to use this but it all worked out ok in the end. I just deleted the subheaders I didn't want in the table and it all lined up well in the end. thanks
February 12, 2024 at 10:43 am
Hey Nick,
That's what I like to hear! Nice job, and I'm glad it was useful to you.
March 27, 2024 at 8:15 pm
very useful! The table of contents is generated very simply. I hope that it can display the H2 title when it jumps.
March 28, 2024 at 10:04 am
Thanks Raphael!
As for your H2, you may have to add a little padding above it, and this also depends on if your site has a sticky (floating) menu that takes up additional screen real estate.
In any case, adding some padding to the top of your blog article H2's in your stylesheet will ensure they always show up after jumping to a link.