The Right Way to Add FontAwesome Icons to Your Blog Posts
Written by ![]()

FontAwesome is a plugin for websites that gives you access to high quality, scalable vector icons that represent just about anything. They work similarly to a font; you can add the icons in text or as tiny images without having to worry about whether or not your audience has the font you want to use installed, or slowing down their browsing experience by downloading it for them. They let you do all kinds of styling for your text, acting as everything from icons in step-by-step tutorials to custom bullet points and more.
If you want to install FontAwesome on your blog, I have the steps to tell you how to install it properly so that it is fast loading and looks great.
Let's dig in!
Key Takeaways
- FontAwesome's free version limits sites to 10,000 pageviews monthly and forces users to download all 1,600 icons, slowing site speed.
- The Pro version ($79/year) offers auto-subsetting, downloading only used icons, plus SVG support and nearly 8,000 available icons.
- Icons are inserted via HTML code using simple class names, and fully styled with standard CSS properties like color and font-size.
- The Post Snippets WordPress plugin lets you save icon code as reusable buttons, eliminating repetitive manual code lookup.
- Lazy loading icons only works with SVG format, available exclusively through the Pro version combined with a lazy loading plugin.
Step 1: Go Pro
Alright, so this isn't really an installation step, more of a recommendation from me. FontAwesome has a free version, but that free version is pretty limited in a few ways. It has 1,598 icons available, but it limits you to 10,000 pageviews per month. A lot of small sites will find this to be plenty, but as you grow, it becomes a huge issue when you run into that limit.
Bear in mind 10,000 pageviews is only 333 pageviews per day. This doesn't mean 333 unique visitors - a single unique visitor may visit 10-20 pages on your site, which means that this pageview limit could be reached with a brand new site that is getting only 20 visitors per day. If you're unsure about the difference between sessions and pageviews in Google Analytics, it's worth understanding before you hit that ceiling.
More importantly, using the free version is pretty slow. FontAwesome requires your users to download the icons you use on your pages so that they can display when they are loaded. The problem with the free version is that it's all or nothing - users are forced to download the entire 1,600 icon pack when your page loads. It's a pretty big file all things considered, and it slows down your site speed and will affect your Google PageSpeed score. The benefit of these little icons isn't enough to outweigh that SEO hit. It's served via the FontAwesome CDN, but it is still a large file and a lot of unnecessary CSS.
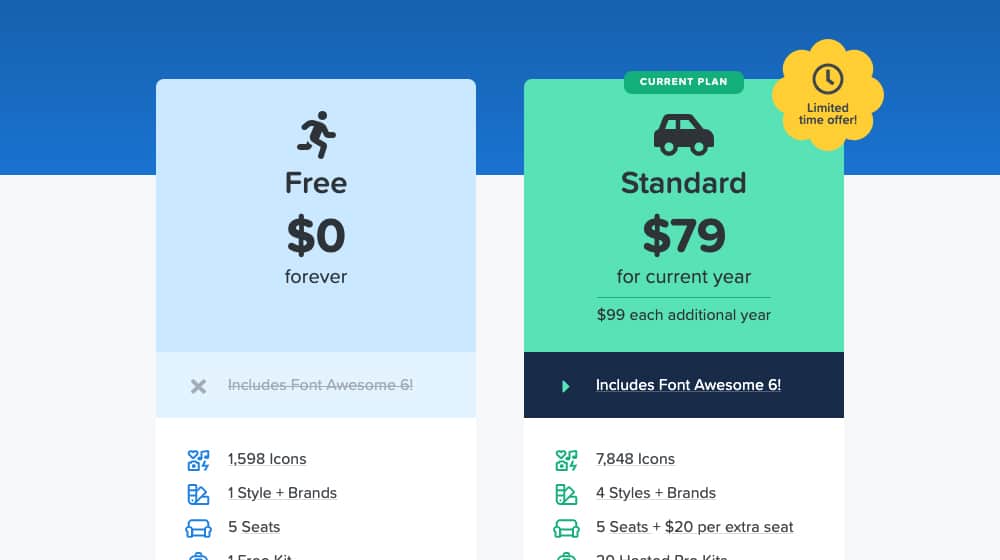
The Pro version has a bunch of different benefits. For one thing, it has way more icons; nearly 8,000 of them, in four different styles. It also allows you to upload 250 custom icons for your own use. It bumps up the pageview limit to a million, as well. Some large sites will hit that, but most people who care about icons like this and aren't making their own bespoke solution will not hit that limit.
There are other beneficial features to the Pro version as well. The most important is auto-subsetting. When you use icons, FontAwesome puts those icons in a subset file, which is the file that's downloaded when a user visits. Only the icons you use are downloaded, making it a much smaller, much faster download.
Another great feature is the ability to choose between the default font code (pure CSS and HTML) or .SVG image files. SVGs are even smaller and faster, and more importantly, they can be lazyloaded so they don't affect your site speed at all. More on that later.
The Pro package is going to cost you $79 for the first year, and $99 per year after that, which isn't all that much; less than $10 per month. They're also in the process of launching their new version, FontAwesome 6, and the Pro version is the only one that gets that for now.
All of that being said, if you're sold on FontAwesome after trying the free version, you should highly consider upgrading to the Pro version. In my opinion, the Free version should never be used in a production environment, and should only be used for testing before signing up.
Step 2: Install the Plugin
FontAwesome has an official WordPress plugin, which is as usual quick and easy to install. You can use the WordPress plugin for either the free or the pro version, the only difference is a bit of additional configuration. With the free version, all you need to do is install the plugin as-is.
For the pro version, you will need to add your domain to the FontAwesome allowed domains list. In order to do that, go here and grab your API token. With that token, go here and add your domain following their instructions.
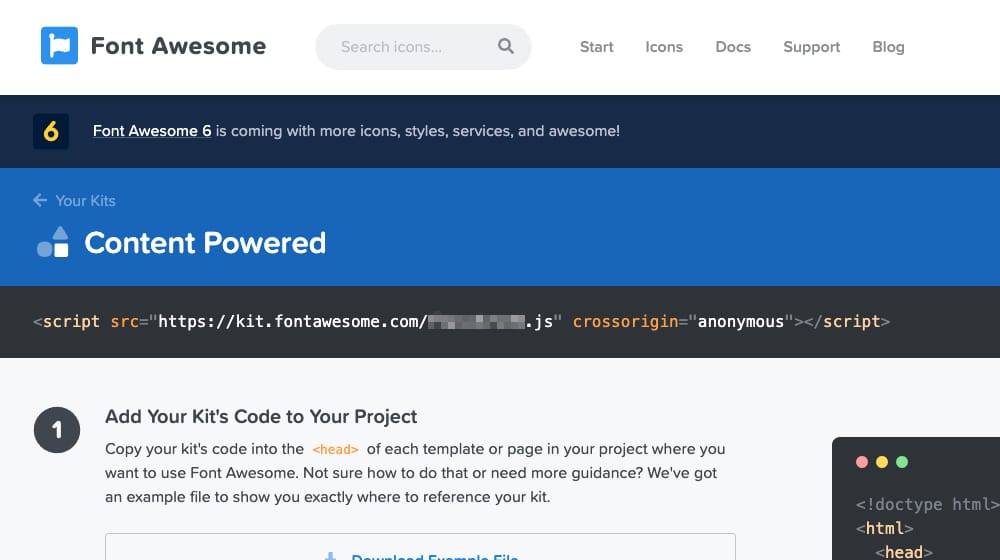
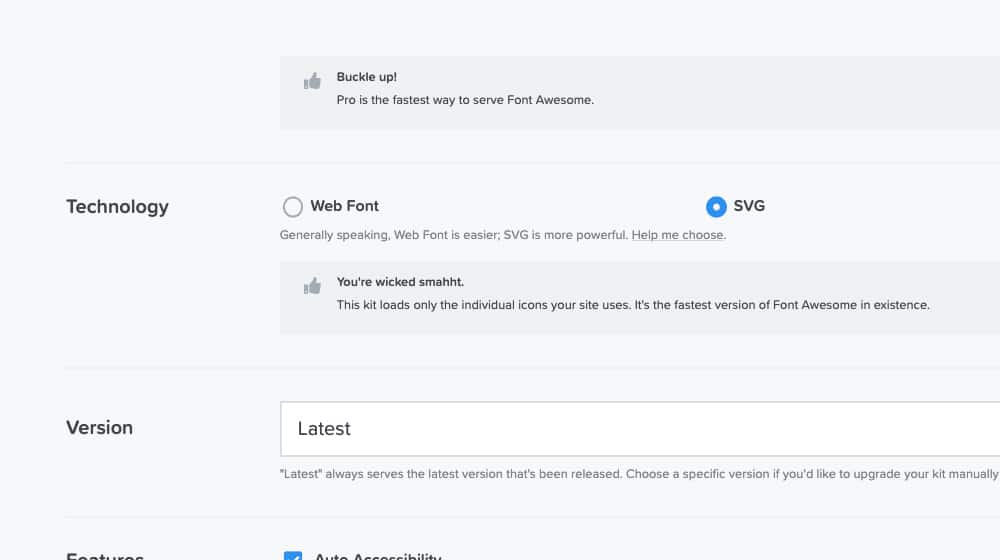
If you don't want to do this with the plugin, you can also do it manually. In your FontAwesome account page, you will find a code generator. After generating your code, click "Settings". Configure the options you want - whether or not you want to use SVGs, which FontAwesome library you want to use, and so on - and choose it. Under "Technology", choose "SVG". You will be given a single JavaScript include that is unique to your site and your account. Take this code and paste it into your footer.php file.
Once the code is on your site, one way or the other, you're ready to start using FontAwesome icons. If you use WordPress, you may also want to check the word count of your posts to keep your content on track.
Step 3: Familiarize Yourself with the Icons
There are thousands of icons available to you. Some are black and white, some are colored, some are two-toned. Luckily, they have the full gallery visible to you. Just click on this link to see it.
You are free to use icons as much or as little as you want, and in any way you want. Here are some I recommend.
- Ad. This is a great icon for sponsored posts, affiliate links, a notice of display ads, and other forms of disclosure. You'll want to test to make sure this works, and don't make it your only source of disclosure, but it works for what it does.
- Brands. FontAwesome has icon variations of the logos of a lot of different brands. This is useful for things like lists where you discuss different brands, icons to indicate products available through different storefronts, or icons that indicate payment options. For example, if you accept Apple Pay, you can use an icon for that:
- Ban. This icon is useful for FAQs, for terms of service, and for step by step instructions where you have important "Read Before Signing Up" instructions. Combine it with styles to make it bright red and it works really well.
- Comment. Icons like this are great to indicate quotes. You can also use quotation mark icons as well. You have a good 40 different options for this, if not more.
- Dollars. A dollar sign is great to flag a more visible version of a price than just using $.
- Exclamation. There are a few different versions of exclamations that can be used as a warning icon, similar to the "ban" icon above.
- Star. They have full, empty, and half stars you can use for reviews.
- Thumbs. They have both thumbs up and thumbs down icons, which are great for pros and cons lists.
Of course, with thousands upon thousands of icons to choose from, you can find one for basically any purposes you could want. Just think of all the times you would normally make a small icon file or png and use that; you can use FontAwesome icons for those instead.
Also, if you want a specific icon and they don't have it, you can commission them to make it and add it to their font packs. You can add your brand logo to their system for $3,000, or you can commission an icon in all 10 of their styles for $300. If you want a whole pile of icons, it costs more, but there's a bulk discount; $5,000 for 24 icons, for example.
I don't know that I'd recommend doing so unless there's something you really want to see added to their library. Adding your own logo probably isn't worth it, but hey, it would allow other people who write about you to use your logo in FontAwesome, and that's pretty cool.
Onto the next step; adding individual code to your website so the icons appear.
Step 4: Copy Each Icon Code
There are two different ways you can insert an icon in your content when you want to use them. You can use the HTML method, or you can use a WordPress shortcode.
I generally recommend using the HTML method. The shortcodes usually work but they're harder to style, and they sometimes don't play nice with WordPress. Since these icons will just display an empty box if they don't load properly, it's generally better to use the method that will make sure they load.
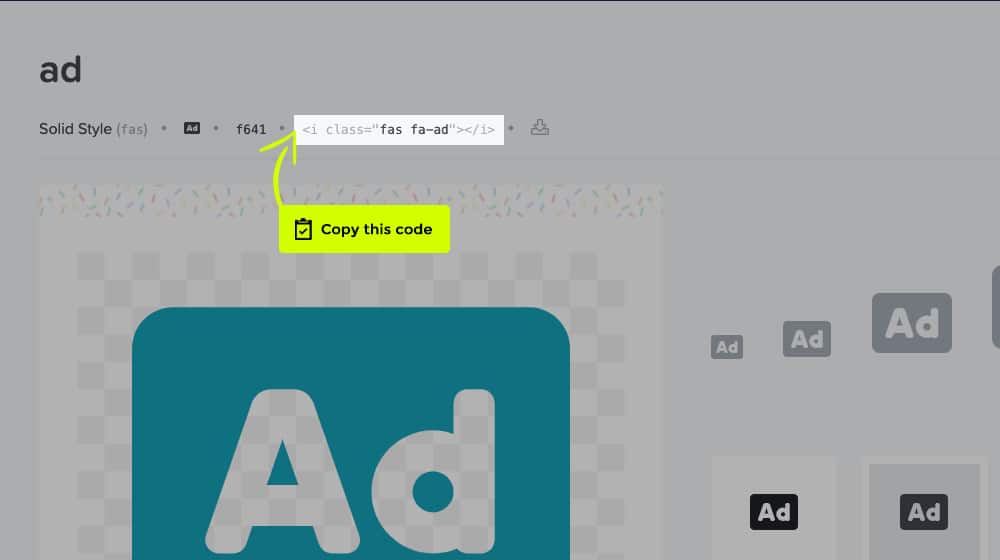
Let's say you want to use the thumbs up icon. To do so, you would find the place you want to insert it and add this code:
<i class="fas fa-thumbs-up"></i>
All of the FontAwesome icons have code like this, which is visible on the page for the icon as I linked above. The fas bit is which style the icon is: fas for solid, far for regular, fal for light, fad for duotone, and so on.
Then the fa-thumbs-up is the name of the icon. Each icon has a unique name, of course, and that's how you call the icon you want.
You can do some basic resizing of the icons directly within that code as well. For example, if you add fa-3x after the icon name, it will make the icon 3x the size of its base form. There are, however, better options for configuration.
Once you've found a list of each icon that you'd like, copy the code for that icon (like in the "thumbs up" example above), and save it somewhere. You'll need those for step 6 of this guide. If you're working with a lot of icon snippets, an HTML minifier can help keep your markup clean and efficient.
Step 5: Style the Icons
Since these icons are technically font files, you can style them using CSS. If your theme uses a style.css file, or if you decide to put your CSS code in-line, you can add code that references the icon specifically and style it however you'd like.
For example, with the thumbs up, here's some CSS code:
.fa-thumbs-up {
     color: #00a408;
     margin-right: 10px;
     font-size: 18px;
}
This code makes the icon size 18 font with a small margin on the right to keep it from kerning into the text. It also colors the icon a deep green.
When you put it next to some text, it looks like this:
The huge benefit here is that anything you can do with CSS, you can do to these icons. Want them different colors? Different sizes? You can change these values to whatever you'd like. If you're unsure which font size unit to use, it's worth reading up on the differences. If you're knowledgable with CSS, this is easy. If not, you can always look into HTML hex color code generators to find which 6 digit number corresponds with the color you'd like your icons to be.
In fact, check this out. Using nothing but CSS, you can make an icon spin and twirl, move, and change colors. You can do a lot of very fancy things with CSS, and you don't need Flash or scripts to do it.
After you're done styling each of your icons with the colors, sizing, and positioning, we can start saving these into WordPress so you can add them to your posts easily in the future.
Step 6: Use Post Snippets
If there's one thing I hate, it's tediously looking up the same thing over and over. Even keeping a reference next to me is a pain. So why not make life easier on yourself?
What I like to do is use another WordPress plugin, called Post Snippets. This plugin, found here, allows you to build a library of code and text snippets. Those snippets can be static or have variables and can be as dynamic as you want to make them.
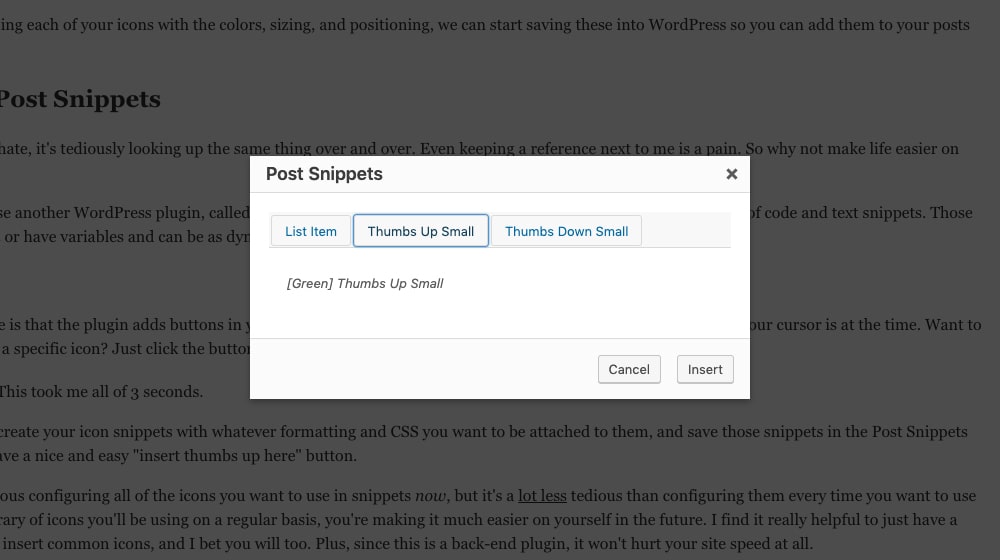
The main benefit here is that the plugin adds buttons in your WordPress Dashboard post editor to paste in a snippet wherever your cursor is at the time. Want to paste in a snippet for a specific icon? Just click the button.
Bam, it's that easy. This took me all of 3 seconds.
All you need to do is create your icon snippets with whatever formatting and CSS you want to be attached to them, and save those snippets in the Post Snippets plugin. Then you'll have a nice and easy "insert thumbs up here" button.
Of course, it'll be tedious configuring all of the icons you want to use in snippets now, but it's a lot less tedious than configuring them every time you want to use them. By saving a library of icons you'll be using on a regular basis, you're making it much easier on yourself in the future. I find it really helpful to just have a handful of buttons to insert common icons, and I bet you will too. Plus, since this is a back-end plugin, it won't hurt your site speed at all.
If you don't want to use another WordPress plugin to do this, you can use programs on your computer itself to do it. For example, the Mac-native Text Expander can save entire blocks of code and tie it to a keyboard command so that whenever you want that icon in your post, you press that key combination, and the app will paste it into WordPress for you. There's also AutoHotKey for Windows.
Really, though, if you have WordPress, you should install Post Snippets and give it a try. Having this functionality built right into the WordPress post editor is super convenient.
Step 7: Lazy Load
We already put the code for FontAwesome in the footer, which helps delay loading, but that's not a lazy load. If you want to really lazy load your icons, you'll need to implement some real lazy loading.
Over in this article, I wrote about the various things that might be slowing down your website. Among them, I mention scripts and images that don't need to load immediately, and how you can lazy load them using WP Rocket.
It's worth noting the only way to lazy load your icons is if they are images.
- The Free version of FontAwesome uses CSS to style code containers, so those are not images and will not be lazy-loaded.
- The Pro version has an option to enable SVG loading of icons which is a web-optimized image format, so these will be treated as images and lazy-loaded as such.
This means once you've enabled SVG icons with your Pro subscription, as long as you have a LazyLoading plugin (like the one built into WP Rocket), your icons will all be lazy-loaded and they will not affect the load time of your website.
This is definitely the way to go - you'll have a faster site, better Google PageSpeed Insights score, better rankings, and a better user experience.
I'm curious how many of you out there have used FontAwesome, or are interested in trying it now that I've pointed it out to you.
What has your experience been with it? Are you excited for FontAwesome Version 6? Let us know what you think in our comments area below!
Written by James Parsons
Hi, I'm James Parsons! I founded Content Powered, a content marketing agency where I partner with businesses to help them grow through strategic content. With nearly twenty years of SEO and content marketing experience, I've had the joy of helping companies connect with their audiences in meaningful ways. I started my journey by building and growing several successful eCommerce companies solely through content marketing, and I love to share what I've learned along the way. You'll find my thoughts and insights in publications like Search Engine Watch, Search Engine Journal, Forbes, Entrepreneur, and Inc, among others. I've been fortunate to work with wonderful clients ranging from growing businesses to Fortune 500 companies like eBay and Expedia, and helping them shape their content strategies. My focus is on creating optimized content that resonates and converts. I'd love to connect – the best way to contact me is by scheduling a call or by email.


April 08, 2021
I wish they would let you choose what fonts you need, requiring that you load the full library seems counterintuitive since it loads more resources...
April 14, 2021
Me too. I think it's worth it since the pro subscription loads images in SVG format. This treats them like images so they can be lazy-loaded. The same thought has crossed my mind though. They need to give a reason for people to upgrade I suppose.
July 24, 2021
It's awesome. Love how the functionality and interface work. It's simple and very easy to use. You also have an option to customize some icons.
July 24, 2021
Hey Ryan,
It's growing on me too! I'm glad this article was helpful to you.
October 22, 2021
Awesome! Thanks for sharing this guide.
October 22, 2021
Hey Franklin, you're very welcome, I'm glad it helped you!
December 29, 2021
I've been using FontAwesome for quite a while now and it seems pretty good so far especially after upgrading to the Pro version. The Pro version is definitely worth considering.
December 31, 2021
Hey Landon, happy new year!
I agree - I think the biggest benefits to using the Pro version is that:
1.) It only loads what you need and keeps your site lean
2.) It loads images in SVG format which means they can be optimized and lazy-loaded
I use Fontawesome Pro on Content Powered. It's super useful!