How to Check That Your Facebook Meta Pixel is Working
Written by ![]()
The Meta Pixel is one of the most powerful analytics tools available to the average business owner. Installed on your site, it can track a wealth of information about your visitors, even more than Google Analytics, with the one caveat that you need to log into the Meta Ads Manager to access that data. It can even track users who aren't logged into Meta platforms, though it won't be able to tie them to specific accounts. It's an incredibly powerful tool.
Like Google Analytics, to install of the Meta Pixel, you need to manually insert the code into your website. Some people are more than comfortable with this process. But others aren't and either way, it's a good idea to verify that it's working once you install it.
There are several ways you can test and verify your Meta Pixel installation. I'll list as many as I know, in case you can't use one or another for some reason. Generally, you'll only need to use one of them to verify. But double-checking can't hurt.
Key Takeaways
- Six methods exist to verify your Meta Pixel: Ads Manager, Pixel Helper, Test Events Tool, manual code inspection, traffic inspection, and Screaming Frog.
- The free Chrome extension Pixel Helper shows colored indicators and diagnoses specific errors like invalid Pixel IDs or duplicate installations.
- The Test Events Tool monitors live event firing in real time, displaying triggered events within 30 seconds of interaction.
- Screaming Frog can automate pixel verification across thousands of pages, though internal checkout pages must still be checked manually.
- Common pixel issues include incomplete code copying, forgetting to save pages, wrong template placement, and incorrectly configured events.
Update: The Facebook Pixel is Now Meta PIxel
Facebook renamed the Facebook pixel to the Meta Pixel shortly after the name change to Meta in October 2021. You can now use the Meta Pixel to track your website visitors and analyze their behavior.
Meta changed the name during their big company rebrand. You'll still get the tracking features that supported you before. You can now connect your data across Meta's platforms like Instagram and Facebook through the Meta Ads Manager. It's all under the same roof.
Your existing Pixel setup will work just as it did before - no need to stress about that at all. But you may want to update any mentions of "Facebook Pixel" in your documentation to "Meta Pixel." When you log into the Meta Ads Manager next time you'll see some fresh and updated branding too. If you run ads on other platforms as well, it's worth checking out whether your TikTok ad spend is actually paying off.
Option 1: Check the Ads Manager
The simplest option you have is to check the Meta Ads Manager to see what it says about the pixel status on your website.
Once you have installed the pixel, make sure to load a page or two on your website, click a few buttons you've assigned conversions to, and generally make sure there's some kind of activity for Meta to track. It might help to pick a device other than your own, log out of your Meta account, or create a secondary testing Meta account to do the activity.
To do this, visit the Facebook Ads Manager by clicking that link, or navigating to it on Facebook yourself. Make sure you're logged into the right account, the one tied to your Page that generated the pixel for your website.
On the Ads Manager dashboard, there is a Pixels tab. Click on that, and you'll see a list of the pixels you have generated. Find the relevant pixel in the list, and look at the header for it. On the right side of the header, you should see a green dot and a date and time, which is the time the pixel activity last updated.
If you don't see the green dot and the activity marker, go do a little more activity and come back later to see if it is recorded. Sometimes there's a bit of delay in the pixel's reporting, simply because of how much data Meta is processing at any given time. If it doesn't report after a few hours, though, or after a day, you'll probably want to start looking for issues with your Facebook ads performance.
Option 2: Use the Pixel Helper
Facebook developed a tool called the Pixel Helper. It's a simple app, a plugin for Chrome, that allows you to analyze the pixel code on any website you visit. You can read more about it here. If it looks like an easy-to-use tool, you can click here to install it.
When you install this plugin, a code symbol will appear on your browser toolbar that looks like </>. If you're on a page that does not have an active pixel, it will be gray. If there is a pixel, but it is broken, it will show as blue with a red number on it. Clicking on it will show you a brief diagnosis of the problem, which you can use to figure out a solution. If there are active pixels with no errors, a green number will appear, indicating the number of pixels active on the site.
To use it, simply make sure you have Google Chrome installed, and using Chrome, go to the Chrome Web Store (or click the link above) to install the Pixel Helper plugin. Once installed, navigate to your site. It should pop up a green number, indicating that your pixel has loaded.
You can click on the pixel helper icon to see more information about the pixel on the site as well. It can show the data parameters set, the setup method, the URL called, the code of the pixel and its location, and more. If you want to compare URLs being called, our URL Compare Tool can come in handy.
Incidentally, this can be a useful tool if you want to browse competitor sites and see what kind of tracking systems they have installed (if they're doing Facebook tracking at all). It's also useful to see just how many sites use Facebook tracking out there. Hint: It's a lot of them.
The Pixel Helper page above shows a list of the errors it can detect and what they mean, so you can use that to help diagnose any errors with your pixel installation. These errors include:
- Pixel Did Not Load. This indicates your pixel code didn't execute.
- Encoded Characters. This means something in your CMS double-encoded code, so instead of, say,
&, you have&&. - Not a Standard Event. This means you configured an event that doesn't match what Facebook thinks it should be.
- Pixel Activated Multiple Times. This means you likely have more than one instance of the same tracking pixel on the same page.
- Invalid Pixel ID. Your pixel ID is incorrect and doesn't match what Facebook says should be a valid, active ID.
- Opted Out of Tracking. This means you told Facebook not to track you, so while the pixel fires, the data isn't recorded. This is a Facebook setting you can change for your account.
- Too Long to Load. This means your pixel code took a long time before executing, typically meaning something delayed it from loading, so it doesn't record accurate data. Tracking issues like this can also affect other platforms - for example, slow load times on Shopify can cause similar data accuracy problems.
There are a few other less common errors as well, all documented on the page. All in all, it's a very useful tool, and well documented to boot. Give it a shot.
Option 3: Use the Test Events Tool
Facebook / Meta has another tool to help test the pixel. This time it's not the presence of the pixel itself, but rather whether or not it appropriately handles and reports events. A normal pixel installation handles most simple events automatically, and you can toggle on advanced event automation. You can also, if you wish, specify manual events you want to be tracked. It's all documented in the "Facebook Developers" section on the pixel.
The Test Events tool essentially sends test data along to the pixel API to test whether or not the process you've implemented is working. If it doesn't, the tool will inform you of that, and what went wrong, if it can diagnose the problem. Here's how you use it.
Once you have the pixel installed and your basic events set up, go to the Events Manager. Choose your pixel from the data sources tab. Click on the Test Events button.
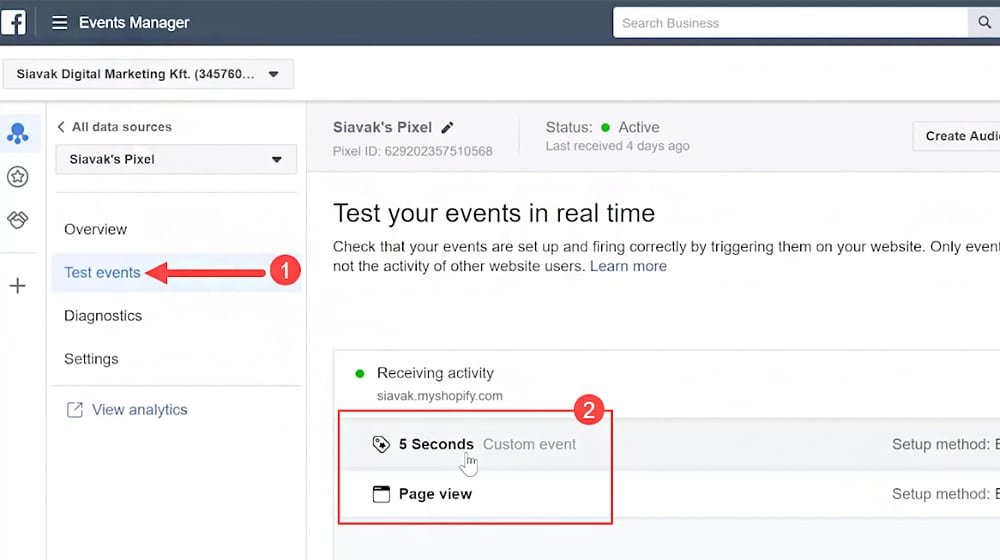
On this page, there will be a frame with Test Browser Events on it. Type in your website URL there and it will load your page in a new window/tab, allowing you to browse and trigger events. This initiates active monitoring, and when you trigger events on your page, they will show up on the Test Events page within 30 seconds. If they don't show up, something is wrong and you'll need to troubleshoot using a meta tag extractor or similar diagnostic tools - it's also worth checking whether meta descriptions and page setup details are properly configured to check your page setup.
Option 4: Manual Code Inspection
This is a simple option. It will tell you if your tracking pixel is installed, but not whether or not it's working.
To do this, first, go to your Facebook page and find your tracking pixel code. Copy the code and paste it into a document so you have it on hand to reference.
Next, visit your website. Pick any pages you want to have the tracking code installed on. I recommend a couple of blog posts, your homepage, a landing page or two, and your checkout confirmation page. If your website has thousands of pages on it, simply pick a representative sample. If your site is small, you can go through and verify it on every page, if you like. The process is easy, you just need to repeat it manually for each page you want to check.
On each page, right-click the page in your browser and click View Source or View Page Source, depending on your browser.
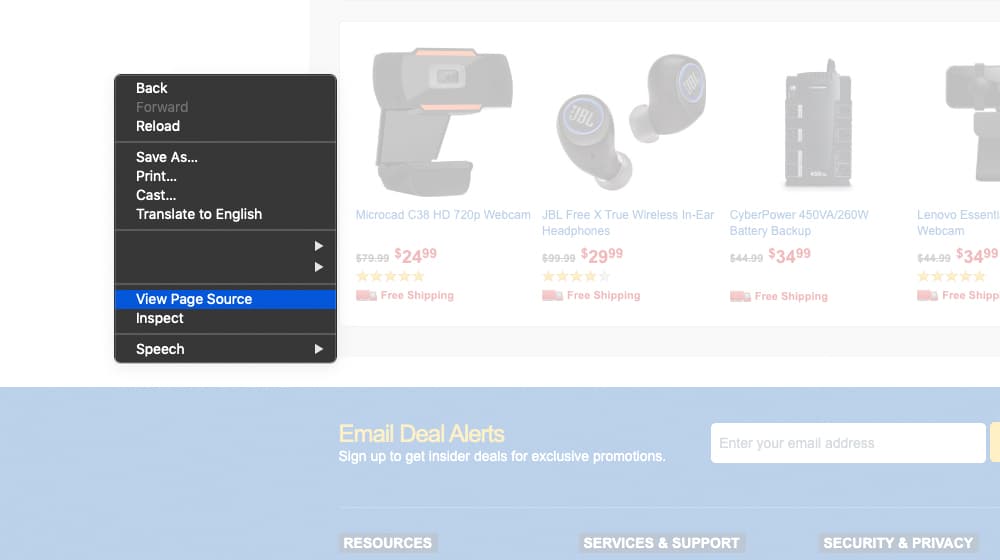
You'll be presented with a window of your site's code as a user sees it. Normally this should be pretty easy to read if you know your way around code, though if you're not a developer, that isn't much of an issue for these purposes. You can search for bits and pieces of your tracking pixel with the CTRL+F keys, or ⌘+F for Mac users, and it will take you to the area in your code where your Facebook tracking pixel is installed successfully.
In the code of your site, search for the pixel tracking code. I recommend searching for your unique Facebook pixel ID specifically, but you can also search for "Facebook Pixel Code" like in my example below.
It should show up wherever you installed the pixel, usually your site header. If not, you do not have your pixel properly installed.
Option 5: Manual Traffic Inspection
If you don't want to use any of the fancy tools available to you, you can always test your site manually, from the perspective of a client or user rather than the administrator. There are two methods here.
1. Method number one is inspect your website's code. On the page you're on, right-click anywhere that isn't a link and click Inspect or Inspect Element. Every web browser has some way to do this, though you may need to look up how to view the page source in your browser of choice. In our example, we'll be using the Google Chrome browser.
In the site inspector, configure a traffic monitor. Click on the Network tab and click preserve log. Make sure "disable cache" is checked. Then, in the filter field, type Facebook. Nothing should be visible, and that's fine.
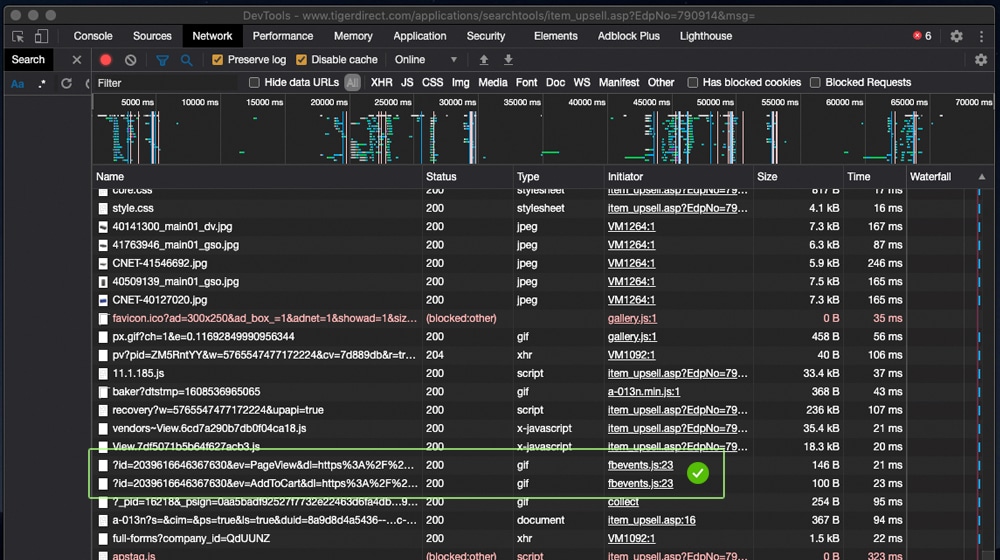
Next, refresh the page. This will reload the whole page, since you disabled the cache, so it won't use a locally cached version. The inspector will monitor traffic, but with the filter in place, it will only display Facebook results. This is the data your site is sending to Facebook when a user loads the page. This should correspond with page load events; try clicking on buttons or adding a product to a cart to see if those events fire as well.
2. Method number two is also in the Network tab mentioned above, but instead of looking for events firing, we're doing something simpler - checking to see if your code exits at all and is being loaded. Run a search for "tr?id=" in the search bar which is part of the tracking code URL.
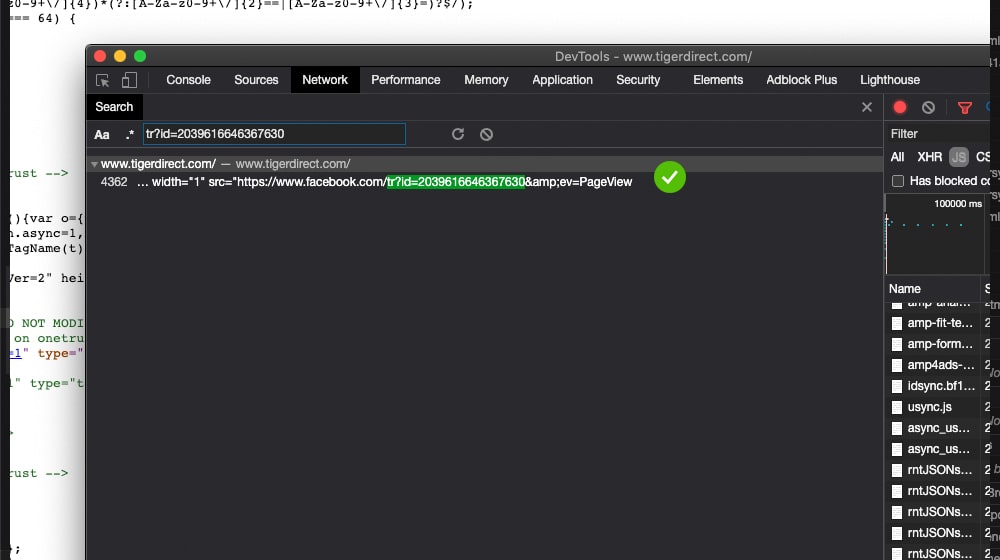
If nothing happens, either you don't have events configured, or your pixel isn't installed. As always, you'll need to do some troubleshooting to figure out what's up. For more details into this process, this post has a good run-through.
Option 6: Screaming Frog
Another option you have is to use a scraper to check for a specific kind of code on your site. I recommend Screaming Frog to do the work for you. This is a good way to automate an otherwise manual check and to check across hundreds or thousands of pages on your site.
Open the scraper and click on Configuration at the top. In this menu, click Custom and start a new Search.
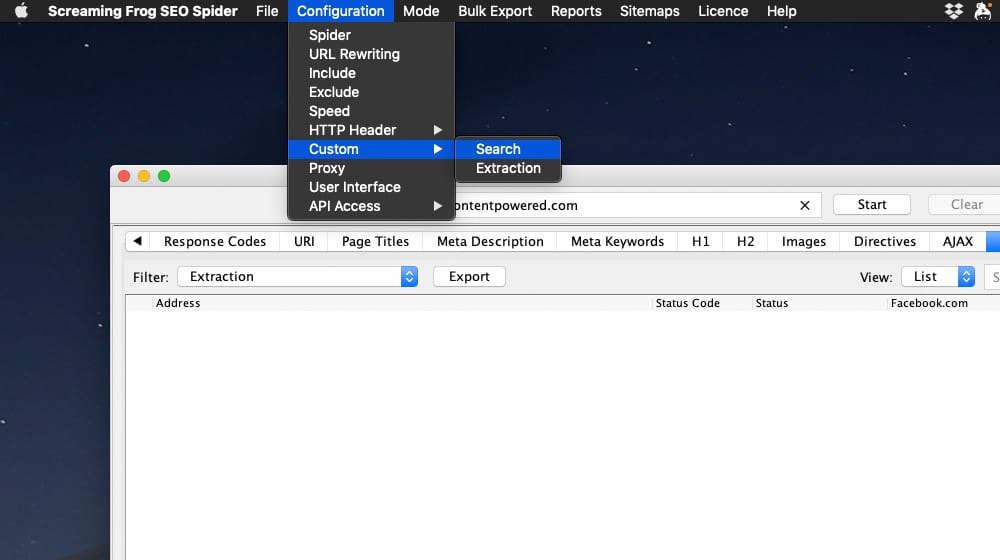
In the filters list, set one as Contains and type in Facebook Pixel Code. You can set up a different filter if you like, such as your Pixel ID, to make sure it doesn't catch pages like, say, this blog post, where that text is in the text of the post.
Type in your URL at the top and run the search. Screaming Frog will run the scrape, and will generate a list of pages that do not contain your code. You can also use this approach to check how much traffic a website gets across your pages once indexed.
Ideally, the search will have the same number of pages that you have on your website, or close to it (with the exception of some of your checkout pages, which you should always check manually).
Fixing Issues
If you've tried these methods and found issues with your tracking pixel, you'll need to figure out what's going on. There are a lot of common issues, but the most common is failing to actually save your pages after adding the code, failing to copy the entire tracking code, and failing to set up the proper events. It can also be the case that you're installing the pixel code in the wrong part of your template and it's only showing up on a fraction of your web pages. You can read all about those and more in the pixel documentation on the "Facebook Developers" section.
Once your code is configured and your events are tracking, all that's left is to aggregate your information. I recommend letting it harvest data for a month or so before trying to act on that data. You'll want to make sure it has gathered a representative sample of what your audience is doing and where they're going. The more data you've harvested, the more accurate that data will be (as well as your decisions that are based on that data).
Have you had any difficulties installing the Facebook tracking pixel? Do you have any tricks or shortcuts for installing or checking the installation of your pixel that we may have forgotten? Let us know in the comments down below!
Written by James Parsons
Hi, I'm James Parsons! I founded Content Powered, a content marketing agency where I partner with businesses to help them grow through strategic content. With nearly twenty years of SEO and content marketing experience, I've had the joy of helping companies connect with their audiences in meaningful ways. I started my journey by building and growing several successful eCommerce companies solely through content marketing, and I love to share what I've learned along the way. You'll find my thoughts and insights in publications like Search Engine Watch, Search Engine Journal, Forbes, Entrepreneur, and Inc, among others. I've been fortunate to work with wonderful clients ranging from growing businesses to Fortune 500 companies like eBay and Expedia, and helping them shape their content strategies. My focus is on creating optimized content that resonates and converts. I'd love to connect – the best way to contact me is by scheduling a call or by email.

July 26, 2021
Thank you for this excellent writeup!
August 03, 2021
Thanks Kenny! Very happy this helped you.